This chapter covers:
- Choosing visualization tools for .usd files.
- Together with Python programming, OpenUSD acts as a rich toolset for reading, writing, editing scenes.
- We suggest three options for viewing .usd files; USDView; Blender; and USD Composer.
- We suggest three options for programming with Python for OpenUSD; using configuring a local virtual environment with Conda; using a cloud based environment; and working directly in Blender for both programming and viewing.
Before you progress to Chapter 2 and begin creating an OpenUSD scene via programming, you will need to prepare your tools by first, selecting a method of visualizing your scene and secondly, setting up a programming environment for OpenUSD.


There follows a step by step approach to setting up your system for working with OpenUSD. The first part, Visualizing OpenUSD, suggests tools that allow you to view .usd files via a viewport with a Graphic User Interface (GUI). The second part, which prepares you for the main topic of this book, teaches readers how to easily set up a coding environment to program OpenUSD using Python.
For Python scripting, we will consistently use command terminals or notebooks externally from the viewers throughout the book. In other words, we will create the .usd files by scripting outside of the viewers, then open or import these files to view them in a GUI. The exception to this rule is USDComposer, where scripting can be done either internally or externally. This approach allows us to present the information more efficiently by avoiding the need to continually address any differences between scripting environments in various viewers.
There are many options available for viewing .usd files, such as USDView (PC or Linux), or Blender, which will run on PC, Mac, or Linux. Mac users can also view .usd files with the built in applications Preview or Quicklook. We will explore three scripting options: using command-line terminals locally, working with Google Colab notebooks in the cloud, and scripting directly within USD Composer’s built-in scripting window.
Figure 1 is included again here as an overview of the options available for programming OpenUSD.

Figure 1:An overview to get started with visualizing and programming OpenUSD. We will introduce how to view .usd files using either USDView, Blender, or USDComposer. Then we will introduce different ways to perform OpenUSD programming using either Command Terminals, Notebooks, or working directly within USD Composer. Readers can choose one of their preferred methods to visualize and program OpenUSD.
2.1 Downloading Assets for Activities
Before choosing your method for viewing .usd files, you can download some pre-built assets that will be used for each of the learning activities throughout the book. They are available to download from our github repository here: https://
The easiest way to access all of these assets is to download the entire repository in one go as a ZIP file. After following the link above, look for the green button called <> Code ▼, click it and select Download ZIP from the bottom of the drop down menu. Once the OpenUSDInOneWeekend folder is downloaded, unzip it in your preferred location. When choosing where to locate it, keep in mind that we will be using its subdirectories as working directories when scripting.
The folders are arranged by chapter, so when working on Chapter 2 you will find all the assets you require in the folder called Ch02. As an example you will find a .usd file called ‘Hello_World.usd’ in the folder called code_and_assets/Ch02/Assets. You can use this to test out your viewer after you’ve downloaded and installed it.
2.2 Visualizing OpenUSD
Although the focus of this book is on programming in Python for OpenUSD, as it is a 3D file format you will need to use the appropriate software to view the .usd files you will create. You can choose one of the following methods to open and visualize .usd files:
- USDView: a light-weight application developed by Pixar Animation Studios to display .usd files.
- Blender: a 3D Computer Graphic Software, can all import .usd files.
- USD Composer: This is part of NVIDIA’s Omniverse, a suite of applications that are built around OpenUSD. If you have an NVIDIA RTX graphics card then you can use this option.
- Apple MacBook: Though Macs can be used to open USD files as they natively support the format through the apps Preview and Quicklook, we will not be specifically referring to them.
It is not possible for us to give instructions on all the options available at every stage of the book, so you will also need to consider what we will and will not cover in this book
Regarding the options in the bullet list above, from among the many 3D GUI platforms capable of opening .usd files we’ll use Blender as our software examples. USD composer, because it is built around OpenUSD, and Blender because it is free and open sourced with a wide range of features that allow for detailed 3D model inspection and manipulation. However, if you are already familiar with another 3D GUI platform, such as Maya or Cinema4D, you may prefer to use those to view the .usd files we create throughout the book. If you choose to do this, be aware that we will not be providing any instruction specific to these GUIs.
Since we will be programming in command terminals or notebooks outside the viewing platforms, and using the platforms only to visualize the scenes, most content will apply regardless of your chosen viewing option. If platform-specific details are needed, we will highlight them. For example, in the rendering section, we’ll use built-in features of Blender and provide complete instructions for it.
To help you choose the method of visualization that is most suitable for you, Table A.1 gives a breakdown of the key features and drawbacks of each of these applications.
Table 1:A Comparison of Tools for Viewing and Scripting with OpenUSD
| Feature | USDView | Blender | USD Composer |
|---|---|---|---|
| Overview |
|
|
|
| Hardware Requirements |
|
|
|
| Python Integration |
|
|
|
| Rendering |
|
|
|
| Physics |
|
|
|
| Collaborative Workflows | Not designed for collaborative workflows. | Not designed for collaborative workflows. | Suited for collaborative environments where multiple users may need to interact with and modify the same .usd files. Live collaboration requires additional software connectors that we will not be covering in this book. |
| Interface and Support | Simple interface. Relatively small but growing support base at present. | Complex interface. Huge support base with ample forums and tutorials available. | Complex interface. Moderate but growing support base, though NVIDIA docs can be difficult to navigate. |
| Operating System | Windows, Linux, Mac | Windows, Linux, Mac | Windows, Linux |
To summarize Table 1, and help you to make your decision, we feel that the best option for working through this book is Blender. It has many advantages being capable of all tasks we cover, provides high quality visualizations, and has a built-in scripting window, removing the need to use external scripting methods. However, if you do have at least an RTX graphics card, the next best option would be Omniverse USD Composer.
Once you have chosen one or more of these three platforms, you can follow the instructions in the relevant section below to download and install the relevant software.
[Option 1] USDView
USDView, created by Pixar, serves as a valuable tool for loading, visualizing, and analyzing USD files. It is an excellent entry point for OpenUSD, though its UI is relatively basic and as we will not be covering how to render in USD View, if you select this option, you will only be able to view your .usd files in their most simple form. Further, USDView does not natively support physics simulations, so Chapter 7 on physics will be unavailable to users of USDView.
The best way to install USDView is to download the compiled software and start using it directly. This is easier than building the executable file from the source code. Readers can choose to download pre-built USDView from:
Download Pre-built OpenUSD Libraries and Tools from https://
developer .nvidia .com /usd #libraries -and -tools. The download links are currently about a third of the way down the page. Users can download directly and find the USD release version to download (e.g. USD 24.05, Python 3.10, for Windows. This is the version used for this book). Download UsdView via Omniverse Web Launcher (https://
enterprise .launcher .omniverse .NVIDIA .com /exchange /app /usdview ?kind = app). Readers need to create an NVIDIA account to login and download USDView but you don’t need an RTX graphics card to run it.
If you have used the Launcher, you can simply launch USDView from the Library tab. If you downloaded the pre-built libraries and tools (the first option above), to launch USDView you will need to move the zip file to your preferred folder and then unzip it. This is a large folder, so be prepared to wait some time for it to unzip. The folder structure should be like this:
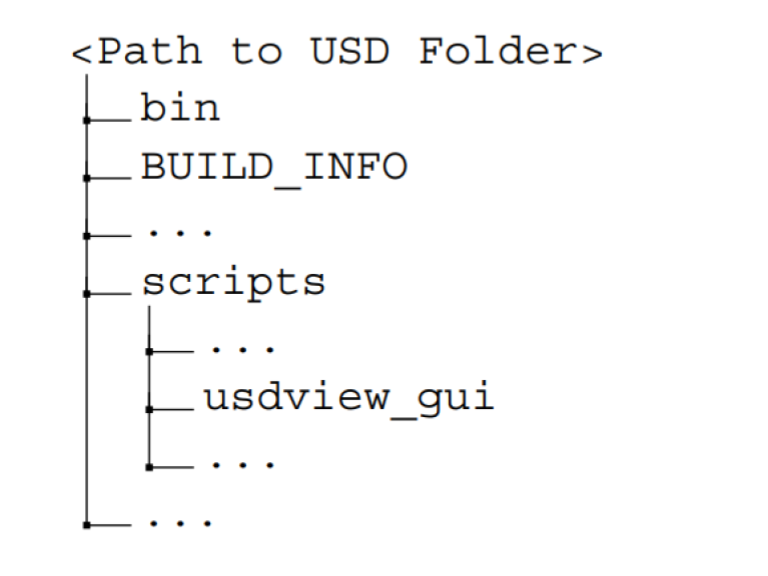
Figure 2:The directory tree within the unzipped USDView folder.
Locate the usdview_gui executable file in the scripts folder and open it. If you encounter a “Windows protected your PC” warning, click More info and then Run anyway to proceed. Once USDView is launched, open the sample .usd file provided in our GitHub repository at code_and_assets/Ch02/Assets/Hello_World.usd. To do this, use the File menu, select Open, and navigate to the file’s location, or press the Ctrl+O hotkey to quickly select the Hello_World.usd file.
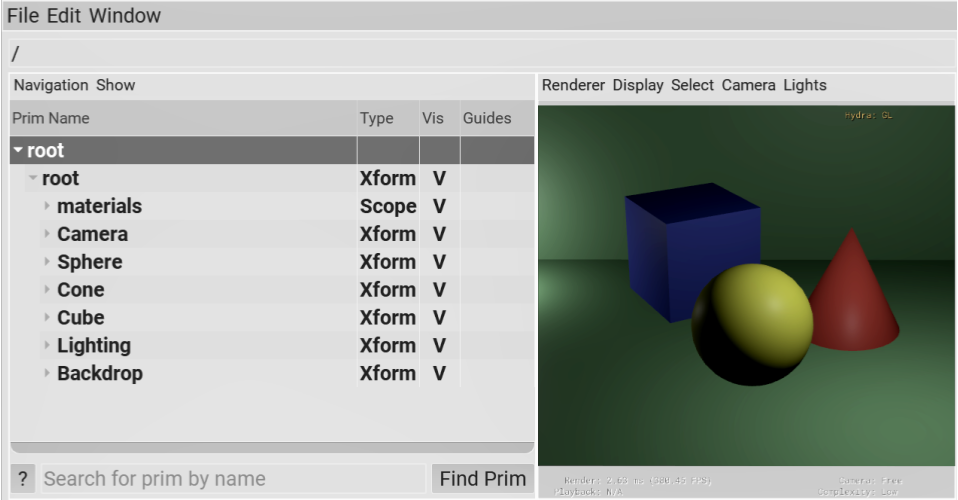
Figure 3:Displaying .usd files using USDView. To open a .usd file, locate ‘File/Open’ on the menu bar or press Ctrl+O to select your file. Look for the .usd file located at ‘code_and_assets/Ch02/Assets/Hello_World.usd’
[Option 2 (Recommended)] Blender
Though there are many other software platforms that will open .usd files, such as Maya, Houdini, C4D and more, let’s take Blender as an illustration of how to open a .usd file using a 3D GUI.
Blender is a powerful and open-source 3D creation software. It encompasses a wide range of tools and features for modeling, sculpting, texturing, animating, rendering, and video editing. It is well-known for its active community, continuous development, and free accessibility, making it a popular choice among artists, animators, game developers, and filmmakers worldwide. Blender not only reads files in USD format but also allows for the conversion of files into USD format for output. You can download the latest version of Blender at https://
Whenever you run Blender, it will open with a splash screen showing options for the type of session you want to open. From there select the General option. This will open the default Blender stage which contains a cube, a light and a camera. As we want to import a sample .usd file that has its own objects, lights and camera, we can delete the default objects. Do this by selecting all the default objects using the hotkey a which selects everything that is visible on the stage, then the hotkey x will present you with the option to delete.
Next, to import the sample Hello_world.usd file that we have provided on our GitHub, open the File menu, select the Import submenu, then click on Universal Scene Description (.usd) and navigate to where you have saved the folder and select the file located at code_and_assets/Ch02/Assets/Hello_World.usd. (see Figure 4)
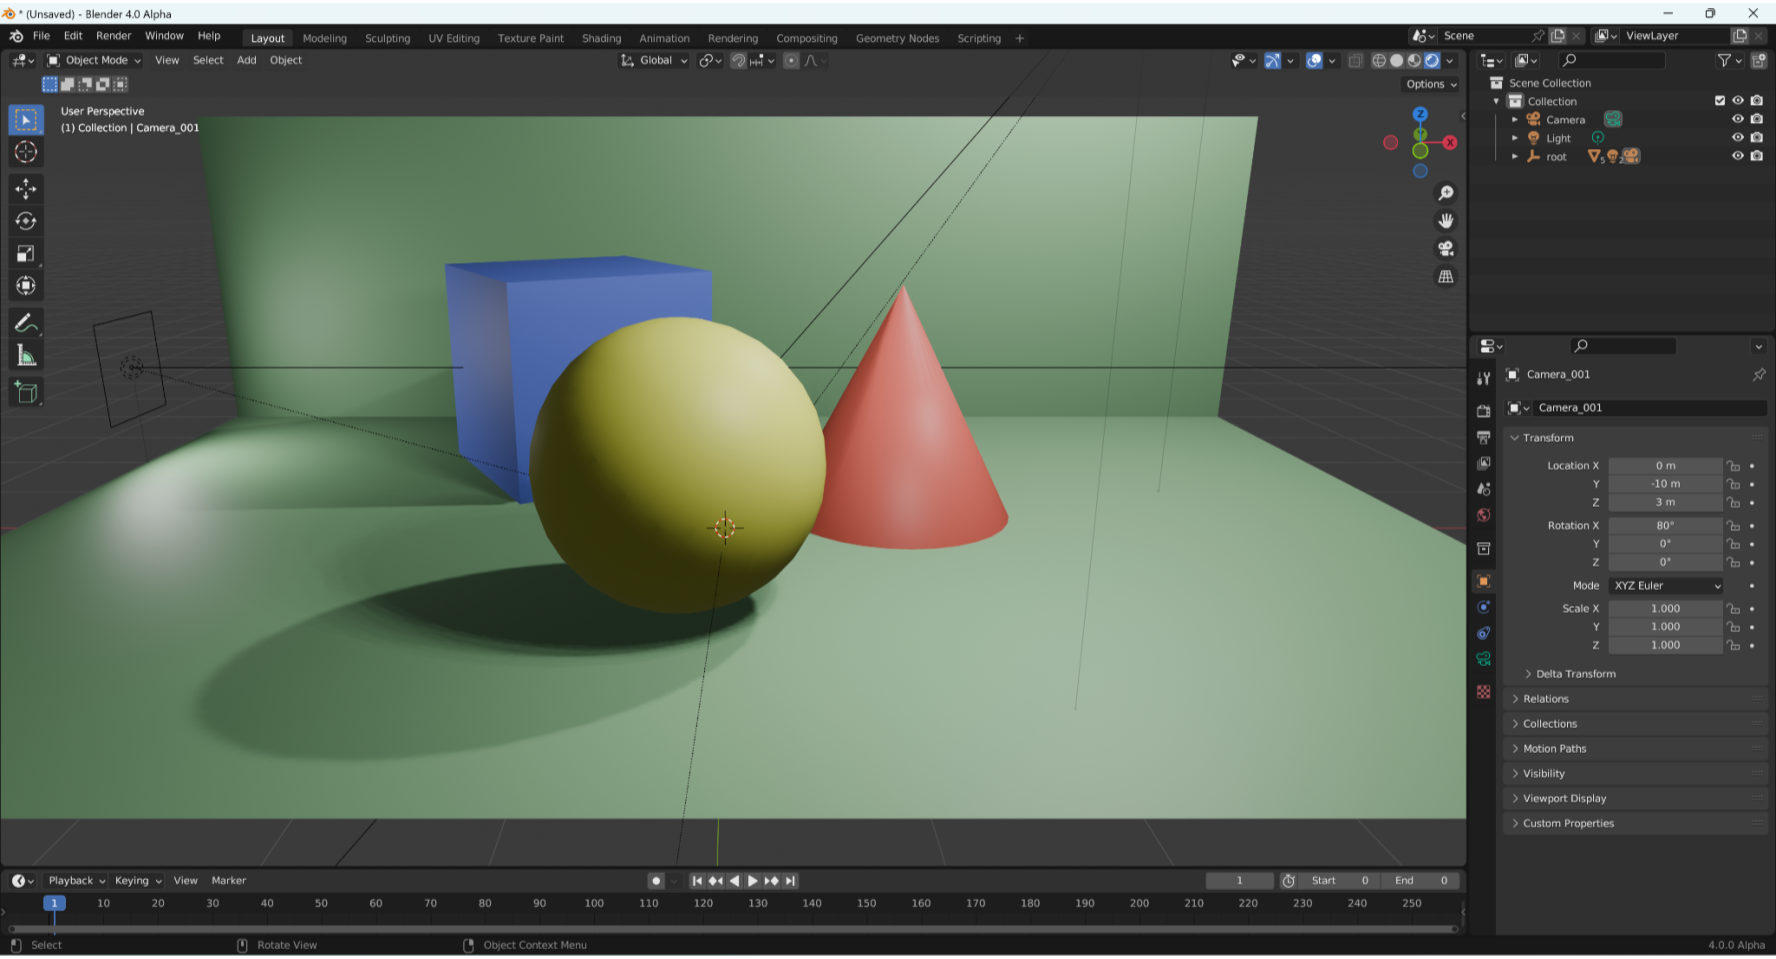
Figure 4:Displaying .usd files in Blender. To load a USD file, navigate to the drop down menu under File-> Import-> Universal Scene Description (.usd*) and select your .usd file. Subsequently, you can visualize the file within the Blender viewport.
[Option 3] NVIDIA Omniverse (USD Composer)
NVIDIA’s Omniverse (www
If you wish to use this method for working with USD, please make sure that you own an RTX Graphic card (see sidebar). The link above will take you to a registration page to set up an NVIDIA developer account, which will be different from any existing NVIDIA account you may have, and requires some more information to be submitted. Once the account is created you will be directed to a page where you can download the Omniverse Launcher from the link roughly half way down the page. With the Launcher installed and running you can choose to download any Omniverse app such as, USD Composer, USD Presenter, or USD Explorer to open and display the USD file. Of all the NVIDIA apps available in the launcher, we are only going to refer to USD Composer in this book. The Launcher will handle all installation for you based on the directories you specify during the Launcher set up. NVIDIA provides a simple and short tutorial on recommended settings for the Launcher.
Once the launcher is running, look under the Exchange tab for the available apps and type ‘USD Composer’ into the search bar. It will show up in the ‘Apps’ tab below, click on it to go to the download screen. Once downloaded and installed it can be launched from the Library tab. This is a large download, so be prepared to wait a little while.
When USD Composer is installed and running, you can open our sample .usd file, by opening the File menu in the toolbar and selecting Open, then navigating to where you have saved the sample file. Alternatively, USD Composer opens showing a default Contents window, which allows you to navigate your file system to find and open the sample .usd file. From there it can be opened by double clicking it.
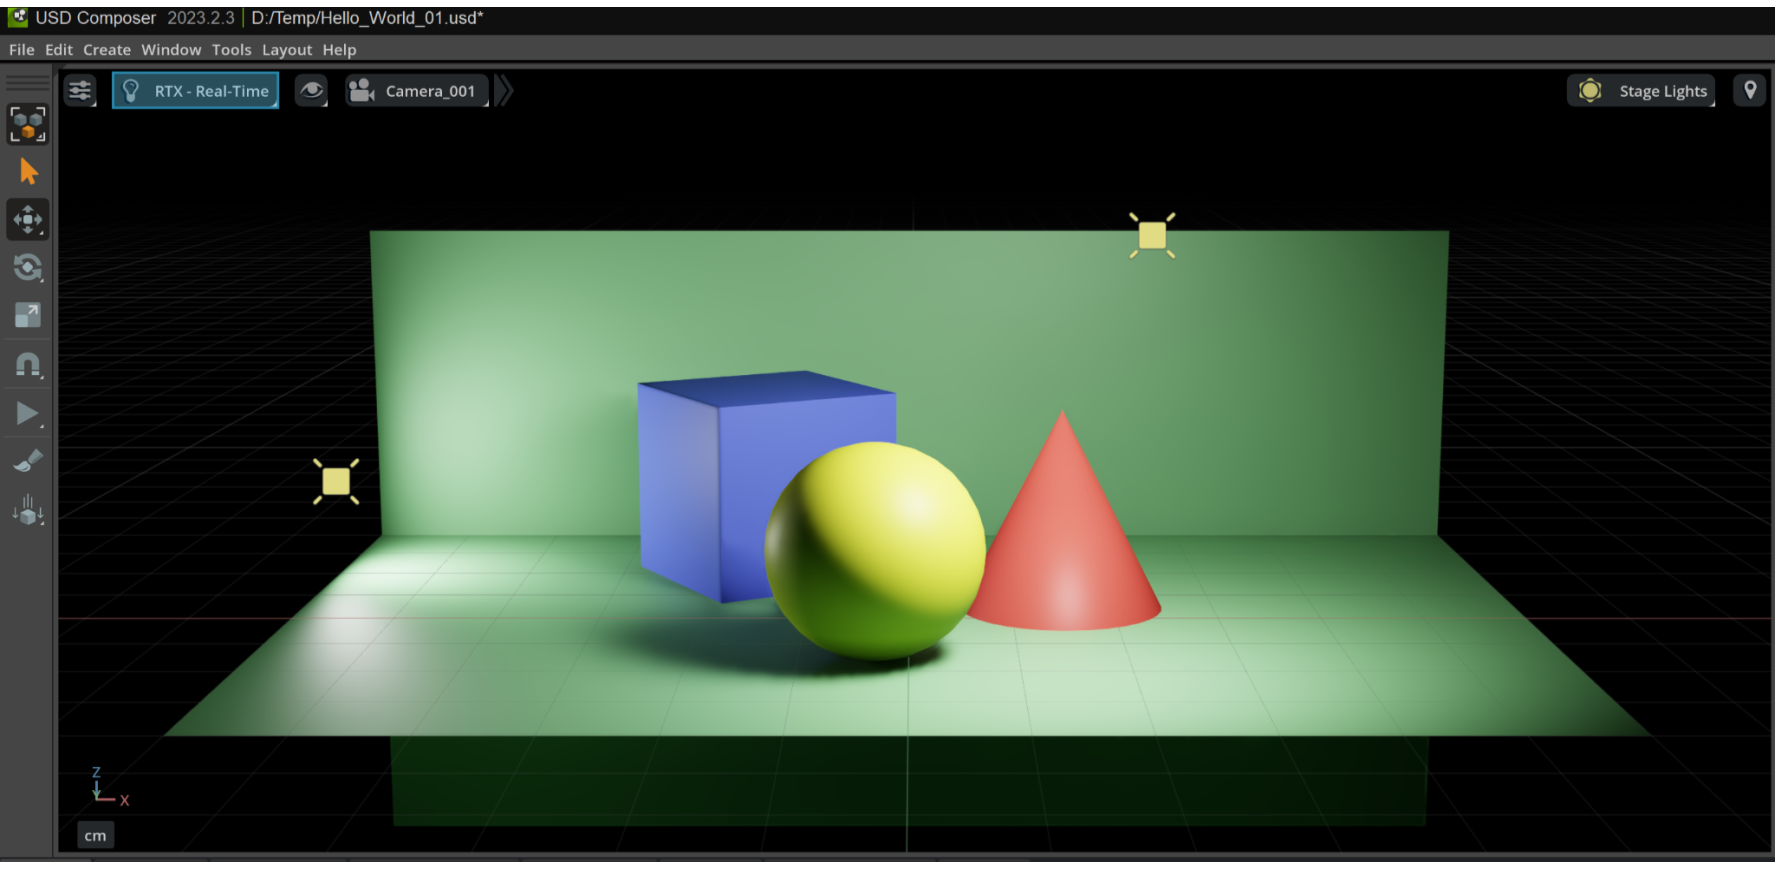
Figure 5:Displaying .usd files in USD Composer. Even though this is the optimal method for performing OpenUSD programming and visualizing USD files, it requires users to have an RTX graphic card.
[Option 4] Apple Mac Native Apps
Notably, Apple is embracing OpenUSD by providing native support for the format on its devices, making it easy for users to access and view USD files without requiring additional software or plugins. Both the Preview and Quicklook built-in applications are able to view .usd files, the Quicklook is more focussed on .usdz files (we’ll explain what they are later), so Preview may be the best option for use with this book. (see Figure 6)
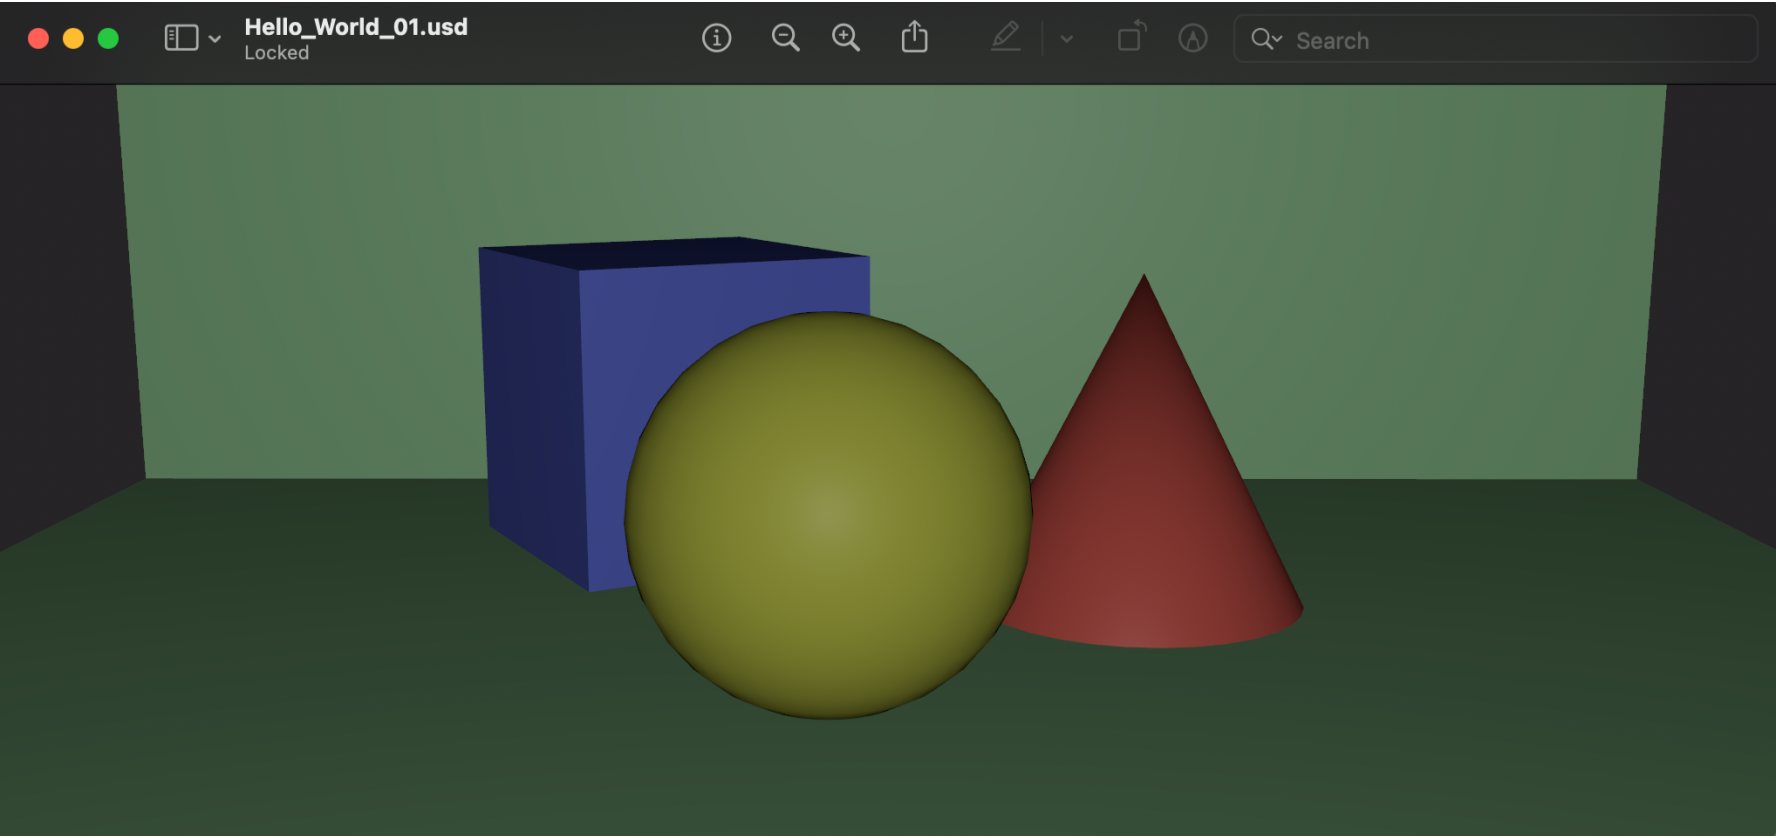
Figure 7:Displaying .usd files on an Apple Macbook. Apple devices natively support the display of USD format files, allowing you to simply open the file directly without any additional steps.
Having explored the options for viewing your .usd files, let’s consider what options you have for programming Python with the OpenUSD framework and APIs.
2.3 Programming Python for OpenUSD
OpenUSD is more than just a file format. It’s an open and extensible ecosystem for describing, composing, simulating, and collaborating within 3D worlds.
Mastering OpenUSD programming allows readers to harness its powerful capabilities for creating, managing, and manipulating complex 3D scenes and assets. This proficiency opens doors to diverse career opportunities in industries such as film, television, gaming, and virtual reality.
We have chosen Python as the programming language for interacting with the OpenUSD framework, because Python is renowned for its simplicity, readability, and versatility, making it an ideal choice for scripting and automation tasks. Its extensive libraries and frameworks provide access to a wealth of tools and resources, facilitating seamless integration with other software and platforms commonly used in the industry.
We will introduce how to set up Python programming for OpenUSD by providing three options to configure the OpenUSD programming environment.
Readers can choose one of the following methods to start programming with OpenUSD:
- Option 1: Configuring a virtual environment locally using Conda
- Option 2: Using a cloud based environment in Google Colab
- Option 3: Programming directly in Omniverse USDComposer (which relies on an RTX graphics card)
If you have already decided which method you would like to use for programming OpenUSD, skip ahead to the relevant subsection. Otherwise, you can read through the options that follow to help you decide which method will suit you best.
[Option 0(Recommended)] Scripting in Blender
Using scripting in Blender to work with OpenUSD gives us far more control, precision, and automation than manual editing. While Blender’s graphical interface is great for quickly creating and manipulating 3D content, scripting—especially in Python—lets us directly interact with the underlying USD data model. In Blender.
Now Blender 4+ directly support OpenUSD programming. If you open the scripting tag, and in the Python console, you can direct use OpenUSD’s Python API to go through this tutorial!
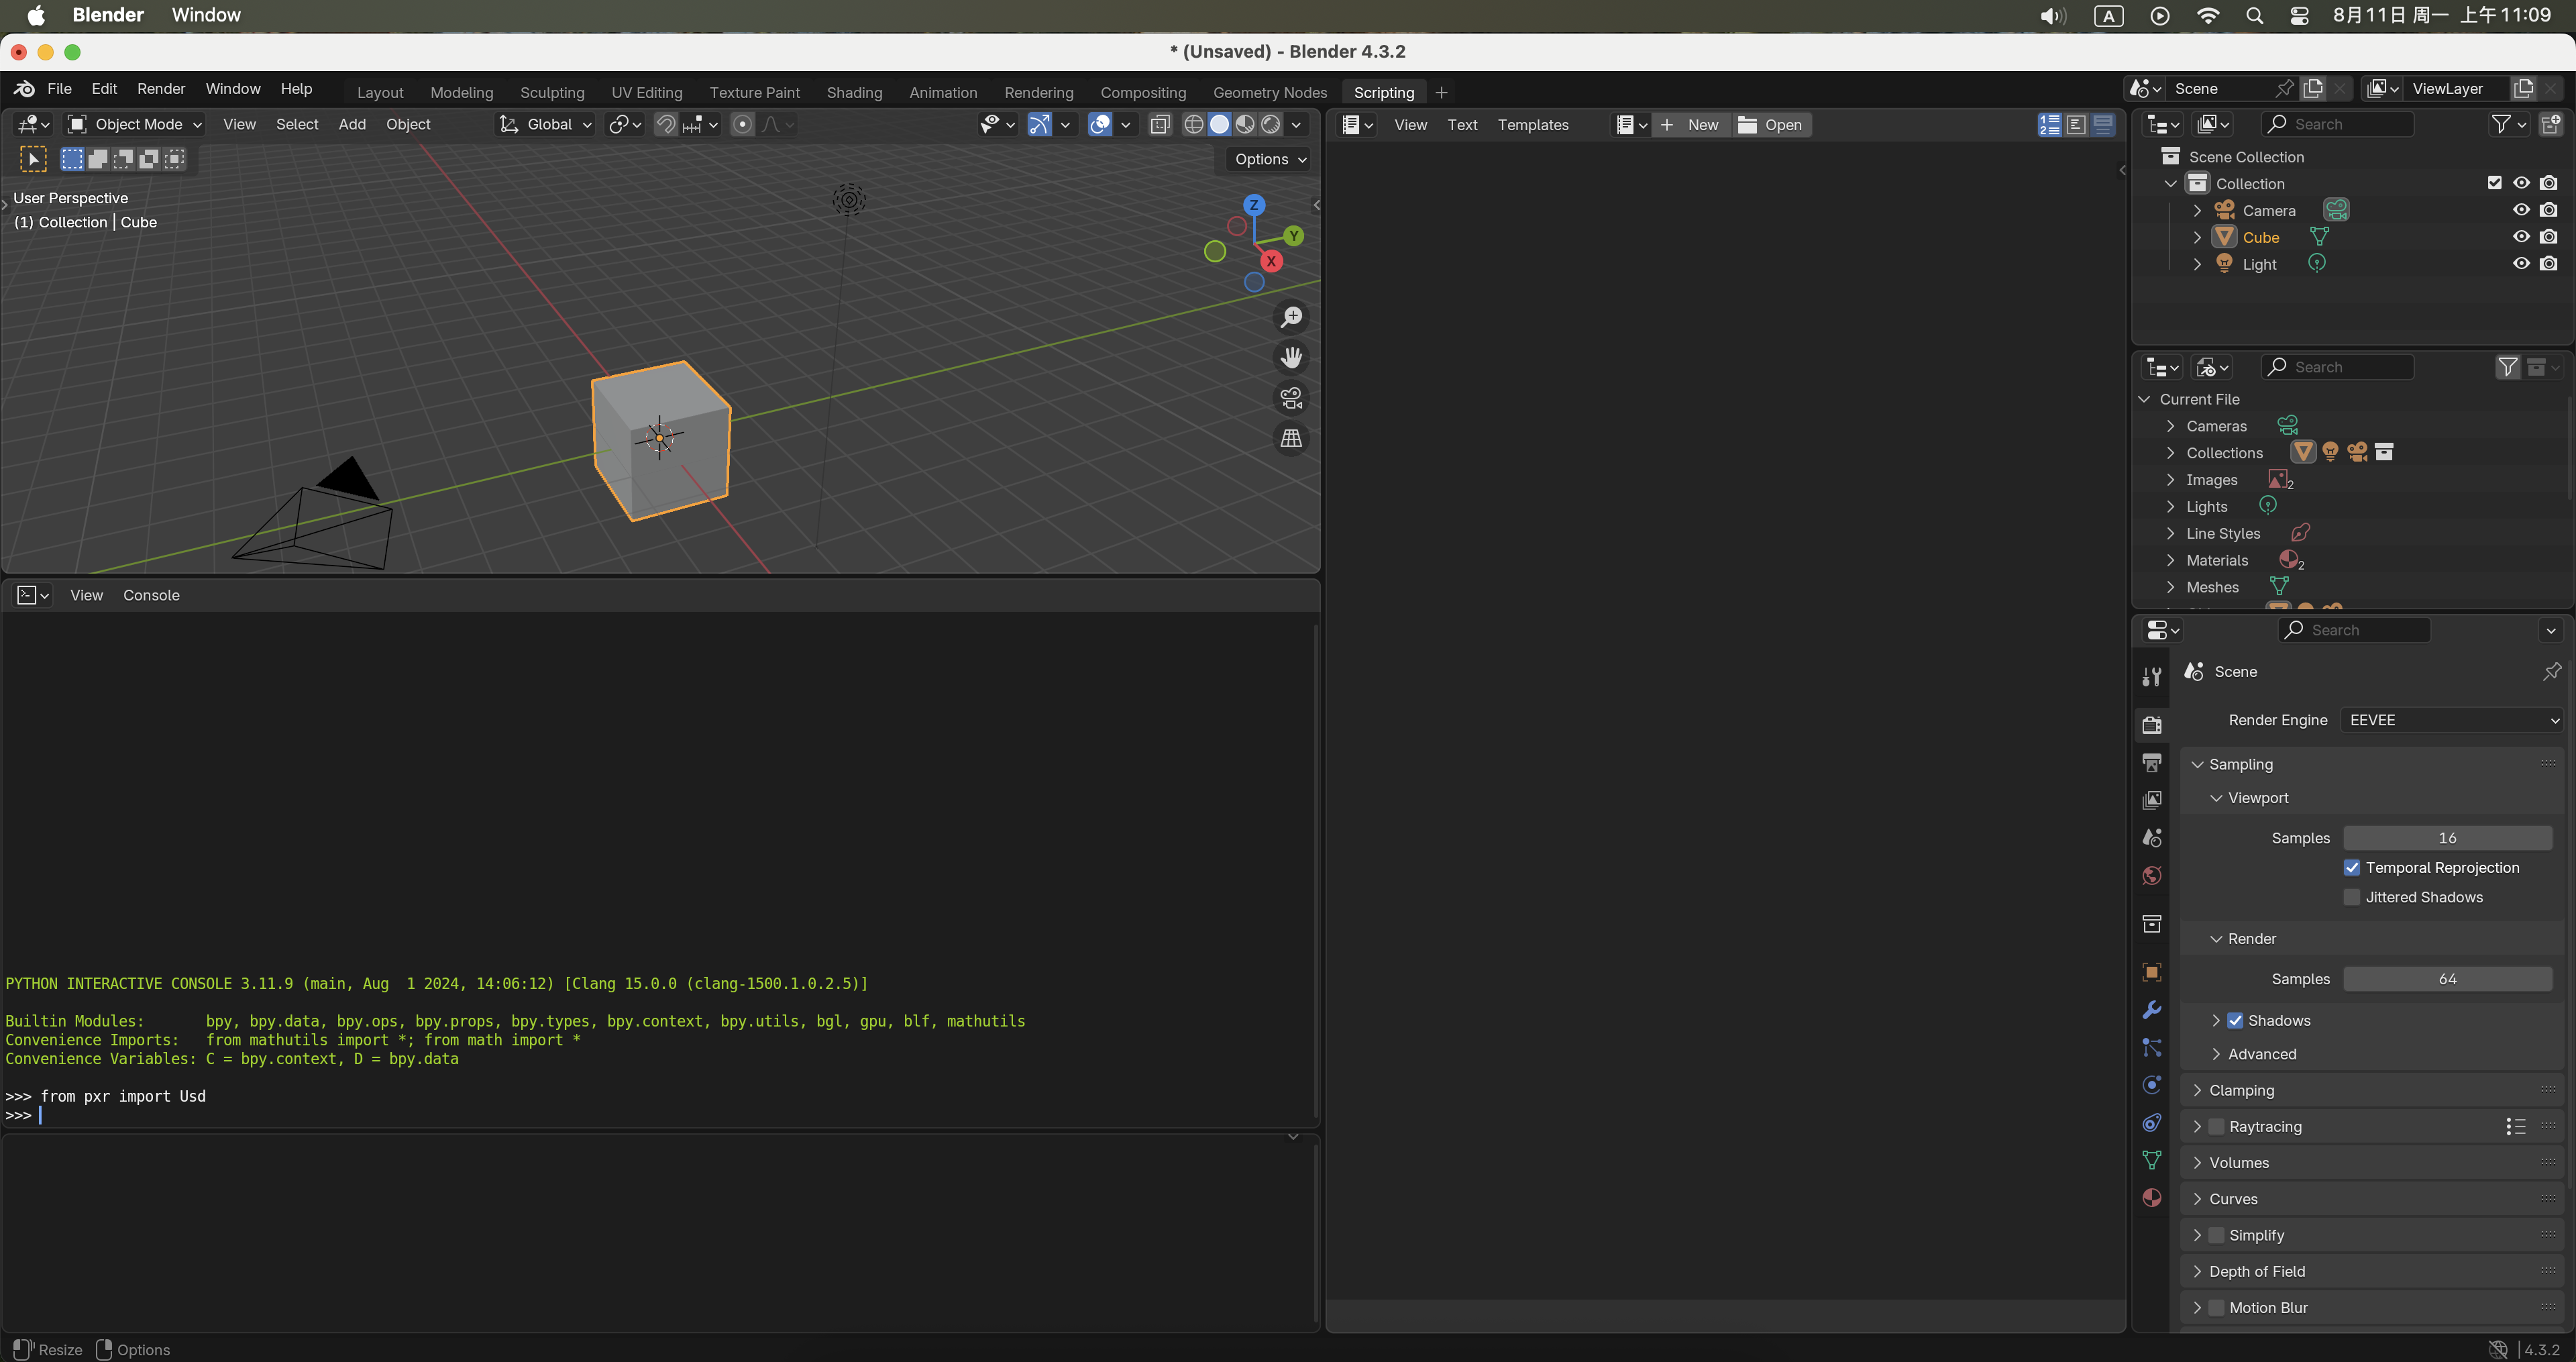
Figure 7:OpenUSD programming in Blender. By locating the Scripting tag in Blender, you can directly run OpenUSD programming in Blender’s Python Console.
[Option 1 (Also recommended)] Using A Virtual Environment
A Python virtual environment is an isolated environment where you can install specific packages and dependencies without affecting other projects or system-wide Python installations. Working in a virtual environment is particularly useful when working on multiple projects with different requirements, as it prevents conflicts between package versions. For example, if you have multiple Python paths specified as environment variables, it is hard for the system to find the desired Python to run.
We recommend using Conda for managing virtual environments because it is a cross-platform, open-source package manager that supports multiple programming languages, including Python. Conda allows you to create, manage, and switch between multiple environments with ease, and it also provides a simple command-line interface for installing, updating, and removing packages.
Conda
To download and install Conda to start OpenUSD programming in Python, readers can follow these steps:
Go to the Anaconda website (www
.anaconda .com /download) and download the latest version of the distribution that matches your operating system (Windows, MacOS, or Linux). Once the download is complete, run the installer and follow the prompts to install Conda. The installer will install both Conda and the Anaconda distribution of Python, which includes many commonly used packages and libraries.
After the installation is complete, open a
new terminal windowby typinganacondainto the system search bar and selecting ‘Anaconda Prompt’ from the options shown. Once open, run the following command to verify that Conda has been installed correctly:
conda --version This should display the version number.
- To create a new Conda environment with Python, run the following command:
conda create -n openusd python=3.10 This will create a new Conda virtual environment named openusd and install Python 3.10 in that environment.
- To activate the new environment, run the following command:
conda activate openusdThis will activate the openusd environment, and any packages you install will be installed in this environment.
- To download the
usd-corePython package run the following command:
pip3 install usd-coreThis will install the OpenUSD core package in the current environment.
- Finally, to check the OpenUSD programming environment is set up correctly, activate Python by typing:
pythonThen, to import the Usd module, run:
from pxr import UsdIf no errors are reported on the command line upon executing, this indicates that you have successfully set up the OpenUSD programming environment.
[Option 2] Using a Cloud Based Environment
Cloud-based notebooks are interactive, browser-accessible environments that allow users to write, run, and share code, typically in languages like Python. They run on remote servers, providing computational resources (like CPU, GPU, or TPU) and require no local installation. Examples include Google Colab and Azure Notebooks. We will use Google Colab as the option in our guide below.
Colab
Google Colab is a free, web-based platform for data science and machine learning education and research. It provides a Jupyter notebook environment that allows users to write and execute Python code in the cloud, without the need for any local installation or setup. If you are unfamiliar with Colab, there is a introduction to its features here: https://
One of the key advantages of Colab is its ease of use and accessibility - users can access Colab from anywhere, on any device with a web browser, and start working on their projects immediately. Another significant benefit of Colab is its seamless integration with Google Drive (GDrive), which allows users to store and access their notebooks and data files easily.
Although the initial setup for working in Colab is easy, Colab has a slight disadvantage for our use case. Firstly, the assets that we will provide you via our GitHub repository will need to be downloaded from there, then uploaded to your GDrive, so that they can be referenced correctly when scripting in your Notebooks. Secondly, the .usd files that you create throughout the book will not be viewable directly from your GDrive. They will have to be downloaded or streamed to your machine to be accessible in your viewer. These are minor additional steps in the process, but can make viewing iterations, or correcting errors a little more cumbersome than working locally on your machine.
To experience OpenUSD programming on Colab, you need to sign in to your Google account, then:
- Create a new notebook on Colab: https://colab.new/
- Install OpenUSD Python package by typing this command then pressing the
playsymbol to run it:
!pip3 install usd-coreThe exclamation mark (!) suggests running a system command inside a notebook code cell. 3. Start OpenUSD programming by importing modules from the pxr package:
from pxr import UsdFigure 6 shows a Colab session after installing usd-core and importing the Usd module from the pxr package.
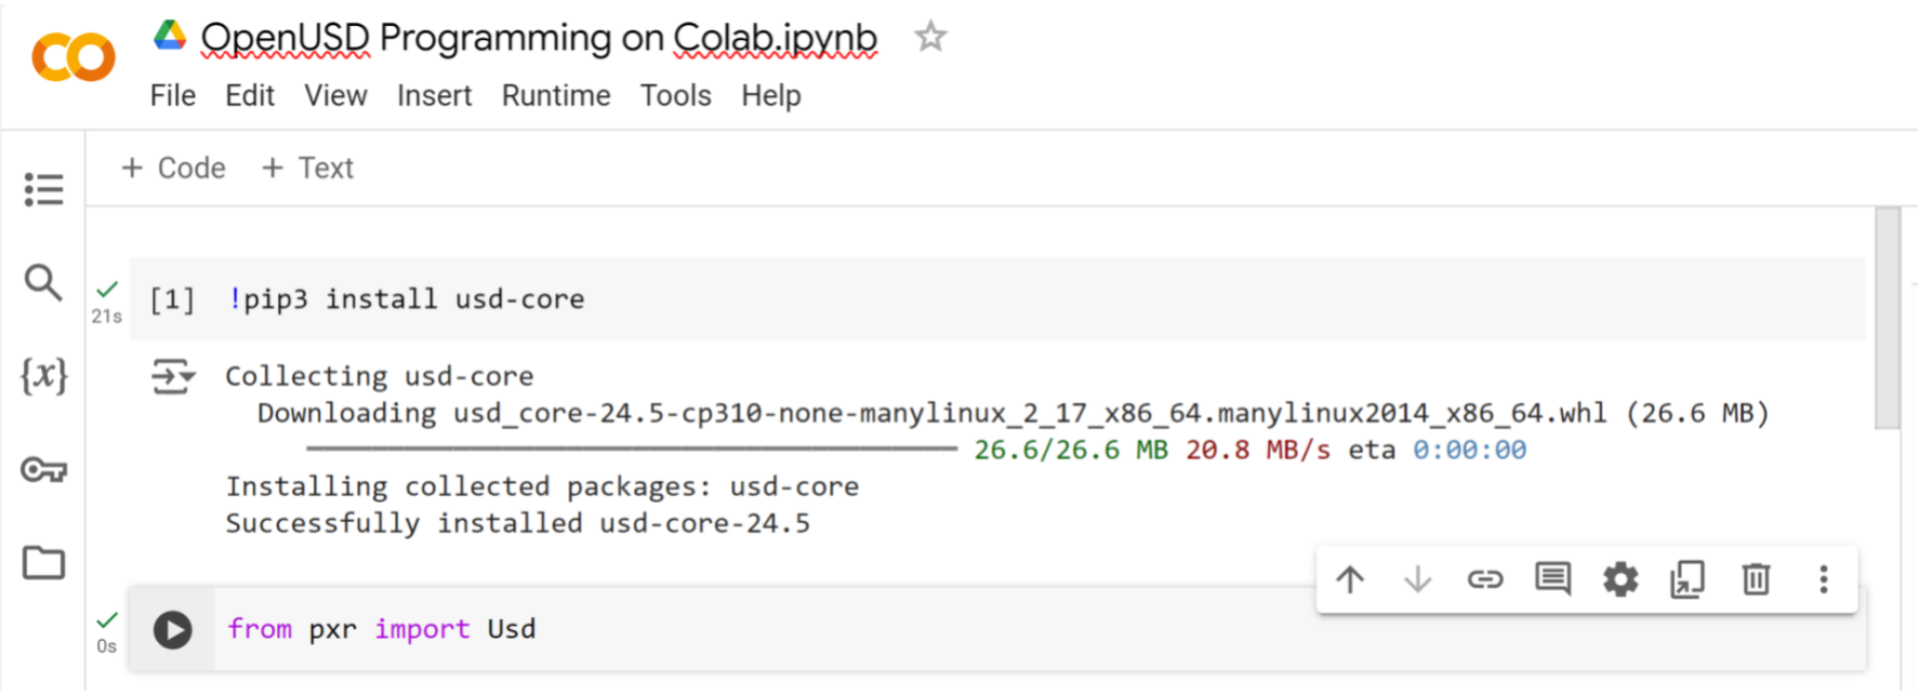
Figure 8:OpenUSD programming on Google Colab. We have to install the usd-core package first, then we can begin importing modules from pxr.
(Option 3) Using NVIDIA Omniverse
Omniverse is a real-time 3D design collaboration and simulation platform that enables artists, designers, and engineers to create and interact with 3D content in a shared virtual space. This platform allows for seamless collaboration, enabling multiple stakeholders to work together in real-time, regardless of their physical location. It is directly built on top of the OpenUSD framework.
One of the main reasons to use Omniverse in the programming workflow is its ability to provide a visual, interactive environment for working with USD scenes. This allows developers to quickly and easily create, edit, and debug their USD-based applications, without having to rely on command-line tools. With Omniverse, developers can visually inspect and manipulate USD scenes, making it easier to identify and fix errors, and optimize performance. Furthermore, Omniverse’s real-time rendering capabilities enable developers to see the results of their changes instantly, making it an ideal tool for rapid prototyping and testing.
However, you may need more powerful hardware to run Omniverse, especially if you are working with large, complex scenes. This is because Omniverse is a resource-intensive application that requires significant processing power, memory, and graphics capabilities to run smoothly. If you’re working with large scenes that contain thousands of objects, complex animations, and high-resolution textures, you may need a high-performance workstation or a powerful gaming PC to run Omniverse efficiently.
If you have at least an NVIDIA RTX level graphics card, you will be able to run Omniverse. To download and install Omniverse, you will first need to create an account with NVIDIA, then install and run NVIDIAs Omniverse Launcher. (https://
USD Composer
Omniverse is actually a suite of applications and connectors designed to work with OpenUSD and other software, in this book we will be discussing primarily the app called USD Composer. Once you have installed and set up the Omniverse Launcher, you will be able install USD Composer by searching for it in the Exchange tab of the launcher.
With USD Composer installed and running, you will be able to access its script editor (Figure 12) by opening the drop menu under Window in the menu bar and toggling Script Editor to On. The window will first appear floating, but can be docked anywhere that suits you.
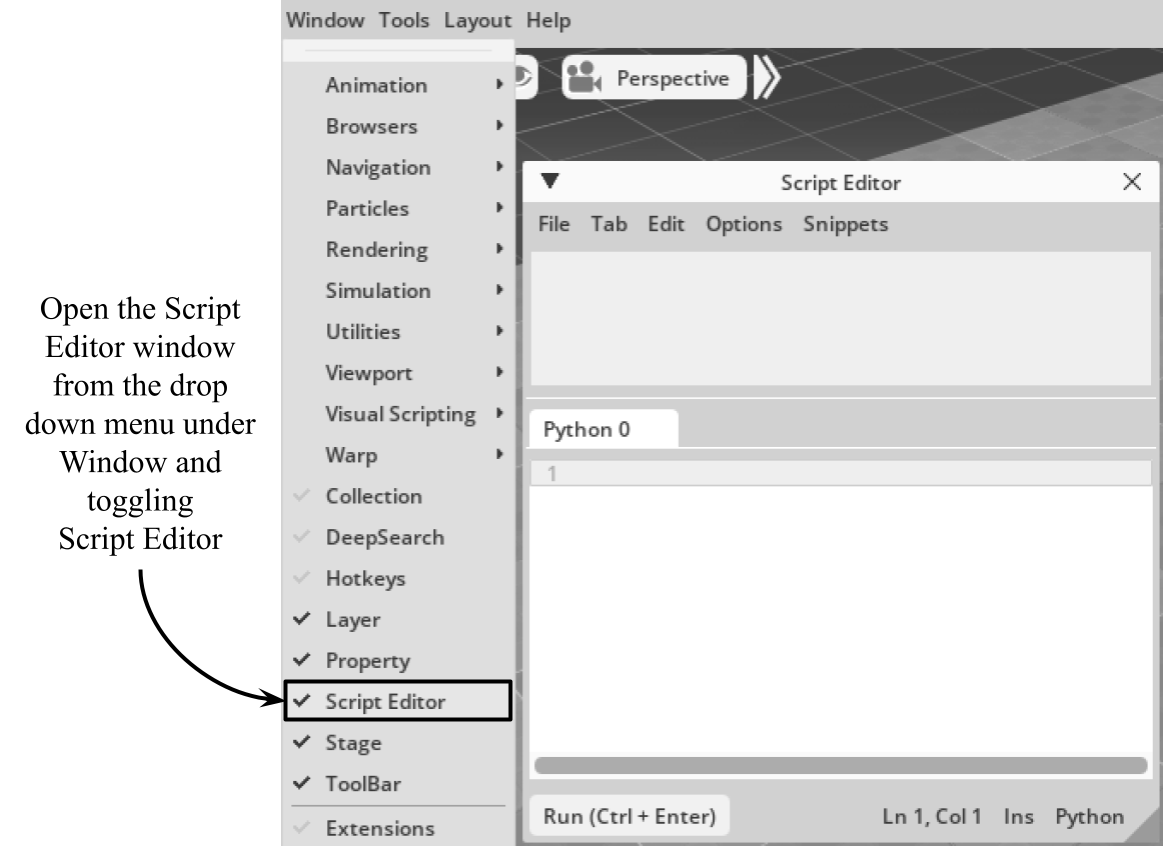
Figure 13:Programming in USD Composer is done with the built-in Script Editor window accessed from the drop down menu under ‘Window’.
Summary
- Throughout the book, Python scripting will be done externally in command terminals or notebooks, with .usd files created outside the viewers and then imported for viewing. The exception is USD Composer, where scripting can be done either internally and externally.
- At present, using Omniverse’s USD Composer is the best way to simultaneously visualize and program OpenUSD. However, due to its high hardware and system requirements it will not be available to all readers. Therefore, we will always include Blender and/or USDView in any discussion around viewers.
- Unlike compiled languages, Python command line interpreters require methods and variables to be executed in advance to load them into memory before they can be called in later commands. This interactive process, though unfamiliar to file-based programmers, allows for rapid testing and debugging in real time.