This chapter covers
- Crafting a USD scene using Python scripts and modules
- Creating a stage with simple geometries
- Importing and referencing assets and defining object layouts
- Examining the different types of .usd file

In this chapter, let’s walk through the process of creating and populating a USD stage. We’ll start by exploring the fundamental elements of a USD stage, then begin creating a very simple scene containing basic geometries to understand the fundamentals of creating a .usd file and adding objects to the scene.
In practice, using pre-existing 3D models is far more common than relying on simple geometric shapes. These models are incorporated into a scene by referencing external files, which assigns them a place in the scene hierarchy. Later in this chapter, we’ll explore a more complex example: a kitchen scene composed of various objects. While we won’t create this scene, we’ll analyze its structure to illustrate the hierarchical relationships between objects (or prims) on a stage. This will highlight how objects can nest within one another, forming a parent/child relationship.
Having explored the theory of referencing, we’ll put your newly acquired knowledge into practice by creating a concrete example of referencing assets. We’ll guide you through building a new USD stage, where you’ll reference another .usd file that we’ve created and made available for you to download.
As we embark on this journey, the early chapters will introduce more general information covering essential aspects of file management, working directories, using Python command-line interpreters, and where necessary, some guidance on using the viewers to visualize the .usd files we create. This foundational knowledge will be valuable throughout the rest of the book. We will introduce this supplementary information as close as possible to its application ensuring that it will be immediately relevant to the tasks at hand.
First of all, let us review some core concepts.
In OpenUSD, a Scene Graph is a hierarchical structure that organizes 3D elements such as objects, lights, and cameras. It is built from key components like the Stage, which acts as the top-level container for the scene, Layers, which manage subsets of scene data, and Prims, which are the individual entities or nodes within the graph. Together, these components enable efficient management of complex 3D scenes.
- A
Stagerepresents a complete scene, which is a hierarchical tree-like structure that contains all the data for a 3D scene. A stage is typically created by loading a preexisting .usd file or by creating a new .usd file from scratch and adding elements. - A
Layeris a container for a set of prims and their associated data. A stage can contain multiple layers. Layers can also be saved to disk as individual files, making it easy to share data between different applications and scenes. - A
Prim(short for primitive) is a basic building block of the scene graph. It represents a single object or piece of data in the scene, such as a mesh, a light, or a camera.
Consider a scene for an automotive commercial. At its core, the scene consists of various Prims, such as the vehicle, props, scenery, lights, and cameras. These Prims could be divided into two Layers: one for the car and props, and another for lighting and cameras. While each Layer is independently editable, the Stage combines their data, displaying the final result based on the Opinions in the topmost Layer.
Before we create our first USD stage, let’s get started by examining the elements of OpenUSD that we are going to use in this chapter, and exploring some important considerations when managing your files.
3.1 Building a Debut USD Scene
To learn the fundamentals of creating a scene, we’re going to create a stage and populate it with a simple geometric form, a sphere. In practice, this kind of scene would rarely be used. However, when learning how OpenUSD operates, it is very useful to be able to quickly create a basic stage and populate it with prims. This stage can then be used to develop a working knowledge of OpenUSD by testing out different modules and functions to observe their effect on the simple prims.
To create the stage with a sphere on it we will utilize some of OpenUSD’s modules that are commonly used for different tasks. Here are some of the key modules in the OpenUSD library:
Usdmodule provides a Python interface to the USD runtime and is used for working with USD stages, prims, and properties in Python code.UsdGeomprovides a high-level interface for creating and manipulating geometric prims such as meshes, curves, and points. It also provides functions for applying transforms, setting material properties, and working with bounding volumes.Sdfmodule offers scene description foundations for serializing scene description into a standardized text format, as well as various formats defined by plugins.Gfmodule provides a set of classes and functions for working with mathematical data in OpenUSD scenes. It includes classes for representing vectors, matrices, quaternions, and other mathematical functions.
Each of these modules contains a set of classes, some of which we will use to create the sphere itself and assign it a place in the stage hierarchy (more on hierarchy in {ref}(exploring-scene-hierarchy). To create the sphere, we’ll use the module UsdGeom (USD Geometry), which provides a set of classes for defining and manipulating geometric prims in a scene graph. Here’s an overview of some common UsdGeom classes used in OpenUSD:
UsdGeom.Xformrepresents a transform node in the scene graph. It acts as a container for other prims and can accept multiple transformation operations (like translation, rotation, scaling) applied in a specific order. In other words, by moving the container, everything inside it moves together, making it easier to manage complex transformations.UsdGeom.Cuberepresents a cube. Useful for simple box-shaped objects. Similar toUsdGeom.Cube, you can define other basic geometries such as a cone, cylinder, or sphere usingUsdGeom.Cone,UsdGeom.Cylinder, andUsdGeom.Sphere. We will use the latter.UsdGeom.Meshrepresents a polygonal mesh. It can be used to define complex geometric shapes with vertices, edges, and faces.UsdGeom.Camerarepresents a camera in the scene. It includes parameters like focal length, field of view, and clipping planes.
For our first USD stage, we’ll use both a Sphere and an Xform prim from the UsdGeom class. Though the sphere is the main object visible on the stage, the Xform plays an important role too. The Xform prim is a powerful tool for improving efficiency in OpenUSD. It does so by providing the following benefits, some of which we have discussed earlier and other that we will expand on later in this chapter:
Hierarchical Organization: Xforms group related objects under a single prim, simplifying scene management and ensuring that transformations applied to the parent prim affect its children uniformly.Transformation Inheritance: Reduces redundant computations by allowing child prims to inherit transformations from parent Xforms.Instancing: Benefits from the hierarchical organization and transformations provided by Xform. Instanced prims reduce memory usage by referencing a single data source instead of duplicating it.
3.1.1 Creating, Populating and Saving a Stage
By setting our working directory correctly, we’ve created the foundation that we will now build upon.
Let’s import the modules Usd and UsdGeom. The following commands will import the libraries, create a new stage, and a new .usd file under the current working directory. Remember, the file we are about to create will be saved in the working directory that you set in the previous section. However, if you are using Colab and you haven’t changed the default working directory to one in your mounted drive, then you should refer back to the text about downloading it, so that you have it in your preferred location.
In your Python console type the following commands:
# Import libraries
from pxr import Usd, UsdGeom
# Create new stage and name it as a .usda file
stage = Usd.Stage.CreateNew("sphere.usda")
Once a stage is created, let’s create a World prim as the root of the stage:
# Define a World prim as the root prim on the stage
world_prim = UsdGeom.Xform.Define(stage, '/World')
Next, we can add some prims to it by using classes from the UsdGeom module:
# Define a new Xform (tra nsform) at the path '/World/Xform' in the stage
xform_prim = UsdGeom.Xform.Define(stage, '/World/Xform')
# Define a new Sphere at the path '/World/Sphere' in the stage
sphere_prim = UsdGeom.Sphere.Define(stage, '/World/Sphere')
Now, we have a stage containing an Xform prim and a Sphere prim. To ensure that the changes we’ve made are preserved in the .usda file we need to save the stage by executing the stage.Save() command:
# Save the stage to the current working directory
stage.Save()
To open or load an existing .usd file in your command terminal or script editor we can use the Usd.Stage.Open command. You won’t need to do this if you have created the stage in the current session, as it is already open in the terminal you are using. This command would be used when you are starting a new programming session and want to work on a pre-existing .usd file:
# Open an existing .usd file for editing
stage = Usd.Stage.Open("sphere.usda")Having created and saved our .usda file, which now consists of a stage and three prims (World, Xform, and Sphere), let’s move on to viewing the .usd file in 3D.
3.1.2 Viewing the Sphere
The method of viewing your newly created sphere will vary depending on which viewer you have chosen. As mentioned in the previous chapter, this book will mainly use Blender for visualizing USD files, as it is freely available, has a wide range of features that allow for detailed 3D model inspection and manipulation, and does not have very high hardware requirements. However, we will also sometimes refer to two other viewers, USDView and USD Composer: USDView, as it is very lightweight and designed for quick inspection and visualization of USD files, making it good for simple viewing and debugging; USD Composer, as it is very comprehensive and includes many tools for complex scene composition and manipulation, making it suitable for detailed editing.
Blender
Figure 2 shows the sphere.usda imported into Blender. When you first open Blender, if you haven’t altered the default settings the stage will automatically contain a cube, a light and a camera. First, select all of these and delete them to give yourself an empty stage. You can use the hotkeys a, x and Enter in sequence to do this. A'selects all, X brings up the delete menu, and Enter executes the deletion.
Next you will need to import the .usd file you have just created by selecting File->Import->Universal Scene Description(.usd) and navigating to your file’s location.
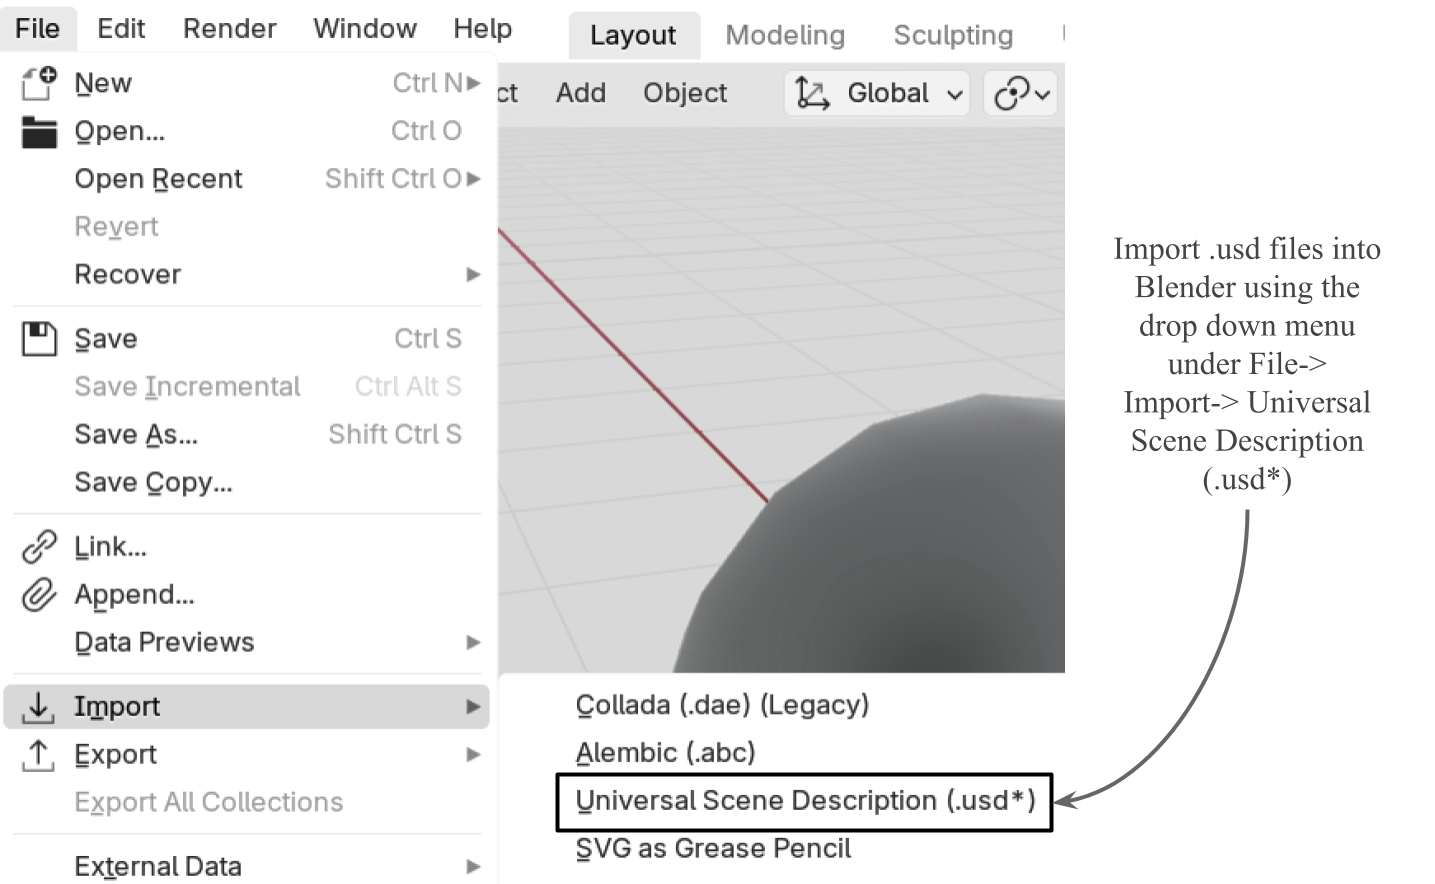
Figure 2:Visualization of sphere.usda in Blender. To view your new sphere in Blender you will need to open a new stage, delete the default cube, light and camera, then import the sphere.usda from the dropdown menu: File->Import->Universal Scene Description(.usd).
USDView
To open the sphere.usda in USDView, go to File->Open and navigate to the directory in which you created the file. Figure 3 shows the sphere.usda open in USDView. The hierarchy of the .usd can be seen in the panel on the left and the sphere itself is visible in the viewer on the right. We will discuss hierarchy more in the 3.2 Exploring Stage Hierarchy.

Figure 3:Visualization of ‘sphere.usda’ in USDView showing the hierarchy of the .usd file.
USD Composer
If you have selected USD Composer as your viewer, Figure 4 shows how the sphere.usda will appear. You can easily locate and open the .usd file from the Content browser that will show at the bottom left by default. Once opened, you will probably find that the stage appears black. This is because USD Composer will initially look to use any lights that are present in the .usd, and as we haven’t created any yet, there is no light source on the stage. For now, you can alter the visible lighting by selecting Grey Studio from the options in the dropdown menu highlighted at the top of Figure 4.
Once you have the viewport lighting set, if you still cannot see the sphere, it may be that it is very small. This is usually related to the scale of the object, so you will need to zoom into it (scroll middle mouse button) to see it. We will discuss the scale later in 3.4 Setting Stage Properties. Alternatively, you can use the hotkey F which will frame all objects on the stage in the center of the viewport.
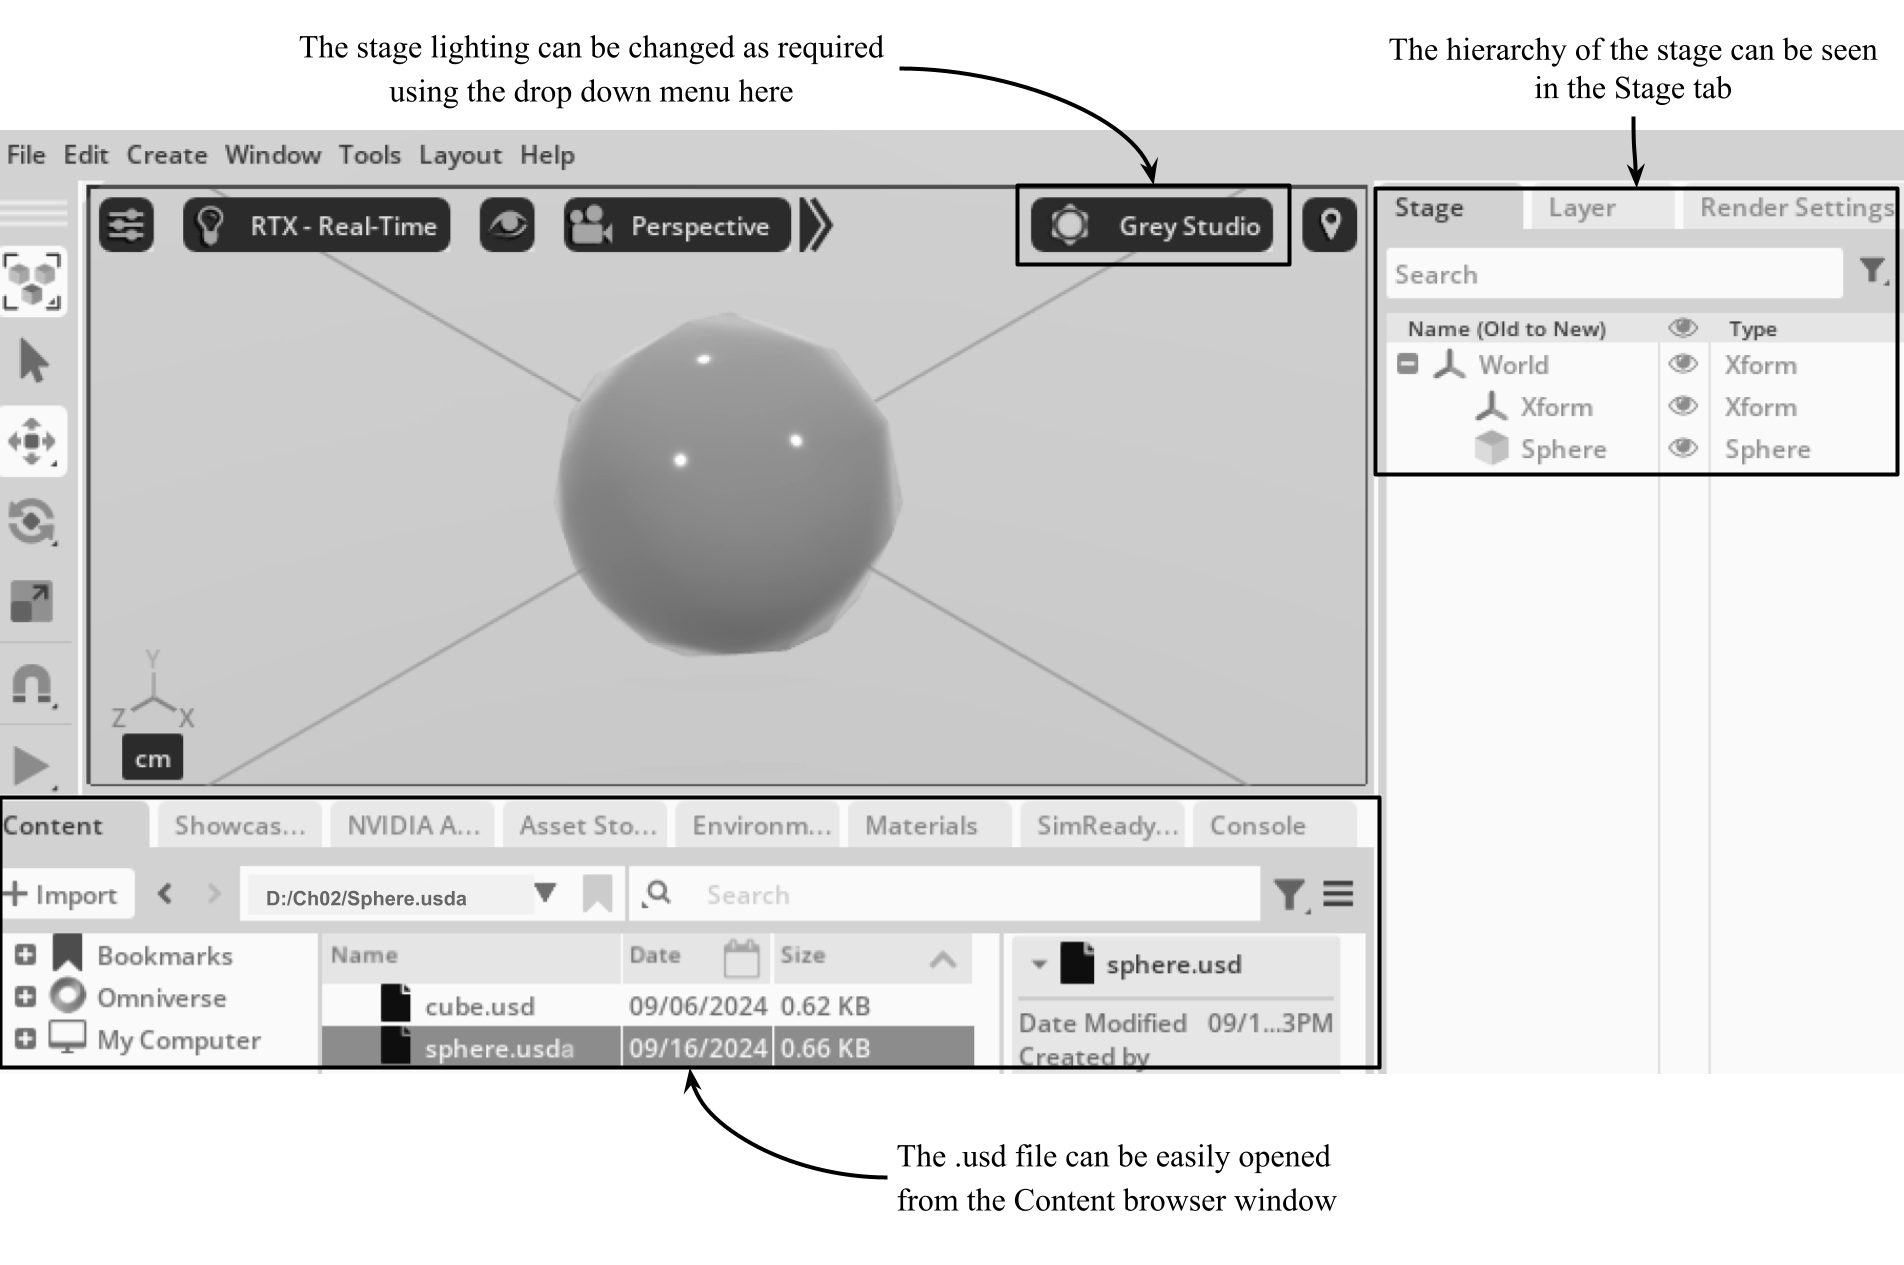
Figure 4:Visualization of sphere.usda in USD Composer showing the hierarchy of the .usd file in the Stage tab, top right. The .usd can be easily opened from the Content browser window, bottom left. The stage lighting can be changed as required using the drop down menu highlighted near the top of the screen. Also observe that the stage hierarchy can be seen in the Stage tab at the top right of this figure. We will discuss hierarchy more in 3.2 Exploring Stage Hierarchy.
3.2 Exploring Stage Hierarchy
A USD stage contains a hierarchy of prims, starting with a root prim at the top level. Any prim that has another prim nested underneath it is thought of as the parent of the prim that is directly below it in the hierarchy. Therefore, any prim nested under another prim is called its child. Each Prim can have multiple child prims, and those child prims can be the parents of other prims, leading to the formation of a tree-like structure. The tree-like analogy can be slightly confusing unless you think of it more like a family tree than an organic tree, as here, the root of the tree is usually represented at the top.
The path to a specific prim is represented by a string that starts with the root prim “/” and includes the name of each parent Prim separated by “/”, with the last component being the name of the desired prim.
To illustrate these relationships in a concrete example, let’s consider a complex scene with multiple objects. We’re not going to create this scene, only use it as an example to comprehend stage hierarchy, and later, we’ll use the same example to show how referencing objects works in OpenUSD.
Imagine you have been asked to create a scene for a game that is set in a domestic kitchen. It would be unlikely, not to mention unwieldy, to have the entire kitchen created as one 3D object. Instead, the scene would best be composed of multiple objects created separately and brought together in this complete kitchen scene. There would be things like an oven, a refrigerator, some pots and pans, perhaps even a chef. As scenes like this one become more complex, they can become difficult to navigate, edit and control if they are not neatly and logically organized. For this reason, as the objects are imported into a scene they will assume or be assigned a place in the stage hierarchy. An object’s place in the hierarchy will define the string that determines the prim’s path in any command or code that you write.
In our example of a domestic kitchen scene, the oven prim might have the path /Kitchen/Appliances/Oven. This string shows that the oven has a parent Appliances and a grandparent Kitchen. In such a stage Kitchen is the highest level prim on the stage closest to the root prim, with Appliances as its child and Oven as its grandchild. Figure 5 shows how this would look in USDView’s GUI.
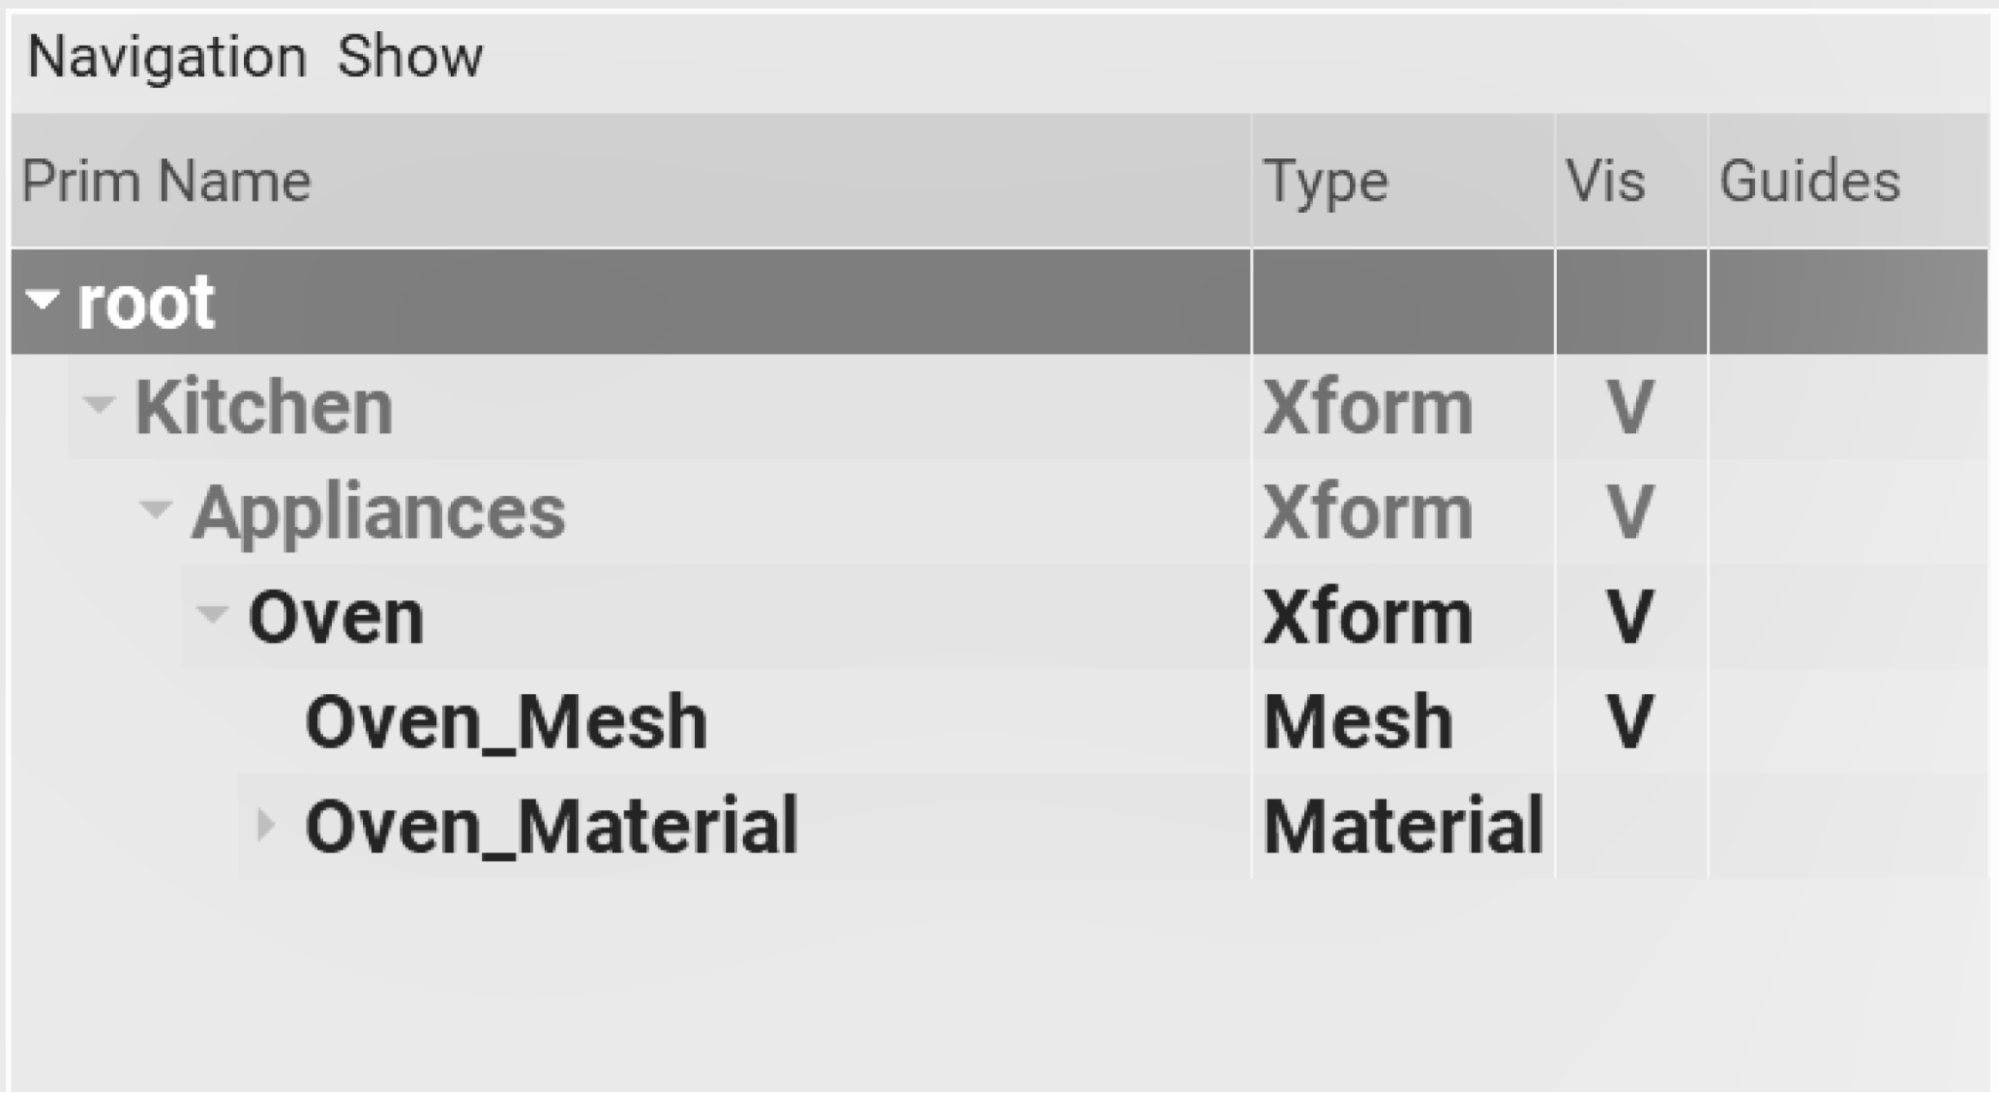
Figure 5:An example kitchen scene illustrating the stage’s hierarchy. The Kitchen is the top level prim with the Appliances.usd as its child, and the Oven.usd as its grandchild. Also, the Oven.usd would be considered the child of the Appliances.usd. This relationship determines the string /Kitchen/Appliances/Oven which would be used as a path for the Oven.usd. Note also, that the Oven.usd is the only prim whose data contains a mesh and a material. This demonstrates how the parent prims are able to remain lightweight by only referencing the data that is contained in their children/grandchildren, etc.
Figure 5 also introduces the concept of referencing which we will cover very shortly in 3.3 Importing Assets. It demonstrates one of the reasons that .usd files can be so efficient by referencing data from other .usd files. The hierarchy shown above reveals the data content of the Oven.usd, namely, the mesh that forms the structure of the oven in the 3D scene, and the material that determines the visual properties of the oven’s surface. We will go into more depth on the topics of meshes and materials in later chapters but have included them in this figure to illustrate one of the purposes of referencing external .usd files in order to maintain efficiency. The Kitchen and Appliance prims are essentially just Xforms with very little data of their own, as they are referencing the mesh and material data contained in the Oven.usd that they both reference.
To see stage hierarchy in action we can look again at our sphere.usda file and see how the prims on that stage can be represented as a prim path. To list all the prims in the stage we can use the Traverse function. The Traverse function goes through all of the prims on the stage. The GetPath function returns the Sdf location of the prim, which contains the prim path information as a string. We will use Sdf.Path next, to create references in our scene.
The Sdf (Scene Description Foundation) library in OpenUSD is a core component that provides fundamental data structures and functionalities for representing and manipulating scene description data. It is used extensively throughout USD for defining layers, paths, attributes, and other essential elements of the scene graph. The method prim.GetPath() returns the Sdf.Path of the prim, showing the position of the prim in terms of the stage hierarchy. We can extract the string type of Sdf.Path using its .pathString property or call str(prim.GetPath()).
Let’s apply the following commands to use the Traverse function to list all of the prims on our sphere.usda stage:
# Print every prim path in the stage
for prim in stage.Traverse():
    print(prim.GetPath().pathString)
In our sphere.usda stage, the prims of the stage (/World, /World/Xform, /World/Sphere) should be printed out.
To retrieve the prim object at a given path, you can use the GetPrimAtPath() method provided by the UsdStage class. When you get a prim, you’re essentially asking the USD system to provide a handle or a reference to that specific prim. This handle allows you to manipulate the prim’s properties, attributes, and relationships with other prims in the scene graph. It’s the coding equivalent of selecting an object by clicking on it in a software platform’s UI.
# Retrieve the prim at the specified path '/World' from the stage
world_prim = stage.GetPrimAtPath('/World')
You can also list the child prims of any given prim. Remember, any prim that is nested under another prim in the hierarchy is referred to as the child of a prim. Conversely, a prim that has children will be referred to as the parent. In the sample stage, we have /World/Xform and /World/Sphere which are the children of /World.
# Get the child prims of the 'world_prim'
children_prims = world_prim.GetChildren()

# Iterate over each child prim, then after this line provide an operation that will affect the selected prims
for prim in children_prims:
    # Print the path of the current child prim as a string
    print(prim.GetPath().pathString)
Similarly, you can get the parent of a child prim. Here we must get the Xform prim using GetPrimAtPath(), then we can get its parent prim using GetParent():
# Retrieve the parent of the 'xform_prim' prim
xform_prim = stage.GetPrimAtPath('/World/Xform')
parent_prim = xform_prim.GetParent()
To remove the prim from a stage:
# Removes the prim at the specified path '/World/Xform' from the stage
successful = stage.RemovePrim('/World/Xform')

# Checks if the prim removal was successful
if successful:
    # Prints a confirmation message if the prim was removed successfully
    print("/World/Xform has been removed")
Having grasped the importance of stage hierarchy, we can now go on to start populating our stage by importing some assets. In doing so, we will observe the construction of a hierarchical structure.
3.3 Importing Assets
It is far more common to build a scene in a modular way by importing external, pre-made 3D assets than it is to build with simple geometric forms and edit them within a usd. For example, if you want to build a digital twin of a factory, you would not start by adding geometric shapes to the stage and editing them until they look like the factory. The factory model would be built using other software, such as CAD or Blender, then exported as a group of .usd files. These files would then be imported to your digital twin ready to be brought to life with all that OpenUSD makes possible. So, let’s now look at two methods of importing external assets, and what their purpose is, then go on to create a new stage where we’ll reference a pre-made model.
When working with external 3D assets in OpenUSD, you have two options for managing them: References and Payloads. Both approaches have their own advantages and use cases, and understanding the differences between them is beneficial for efficient asset management:
- Reference: A lightweight pointer to an external asset, such as a 3D model, texture, or animation. When you reference an asset, you’re essentially creating a live link to the original file on disk. Better suited for essential, always-needed assets since they are loaded automatically with the stage.
- Payload: A type of reference to an external asset which can be selectively loaded or unloaded to optimize memory and computational resources, making them ideal for working with large, resource-intensive scenes where only a subset of data needs to be accessed at a time. Changes to the source file can be reflected by explicitly reloading the payload on the stage.
Soon, we will create a new stage and populate it by referencing an external .usd file. But first, let’s return to our example of a kitchen scene as it is useful to illustrate how referencing is used in more complex scenes.
3.3.1 Understanding References
References in OpenUSD programming are indispensable for managing complex scenes and facilitating collaborative workflows. By utilizing references, users can efficiently aggregate layers or assets onto a stage, aligning and managing various elements within a project. A reference empowers developers to maintain modularity and avoid redundancy in their code. With the flexibility to add multiple references to a single prim, OpenUSD provides a framework for constructing intricate scenes while ensuring efficiency, scalability and ease of maintenance.
Referencing also enables non-destructive editing in a similar way to the layering system, and brings similar benefits of enabling concurrent editing by multiple users. For instance, in film production, referencing allows different teams to work on individual assets (like characters or environments) simultaneously without needing to wait for the entire scene to be finalized.
Where layering all within one stage, referencing external .usd files can be thought of as like layering with multiple stages. Any change in a .usd file’s properties will filter through into any other stage that references that .usd file, unless there is an overriding delta stored in the referencing stage. This parallels the way in which data filters up through lower layers to higher layers, as we described earlier.
Similarly, referenced .usd files can be edited in the stage that is referencing them. These edits will override the state of the original .usd in the current stage but will not alter the original .usd file’s data. The overrides are only stored as deltas in the data of the current stage making them non-destructive.
For a practical example of this dynamic in action, let’s return to our example of the kitchen scene. Previously, we used it to understand a stage’s hierarchy. Here, in Figure 6, it provides more detail of how referencing can be used to provide efficient use of data and enable non-destructive workflows. In this example, the Kitchen_Scene.usd would show a stage that is referencing three prims; Appliances.usd; Utensils.usd; and Chef.usd. Each of these three prims is itself a .usd that is in turn referencing other .usd’s.
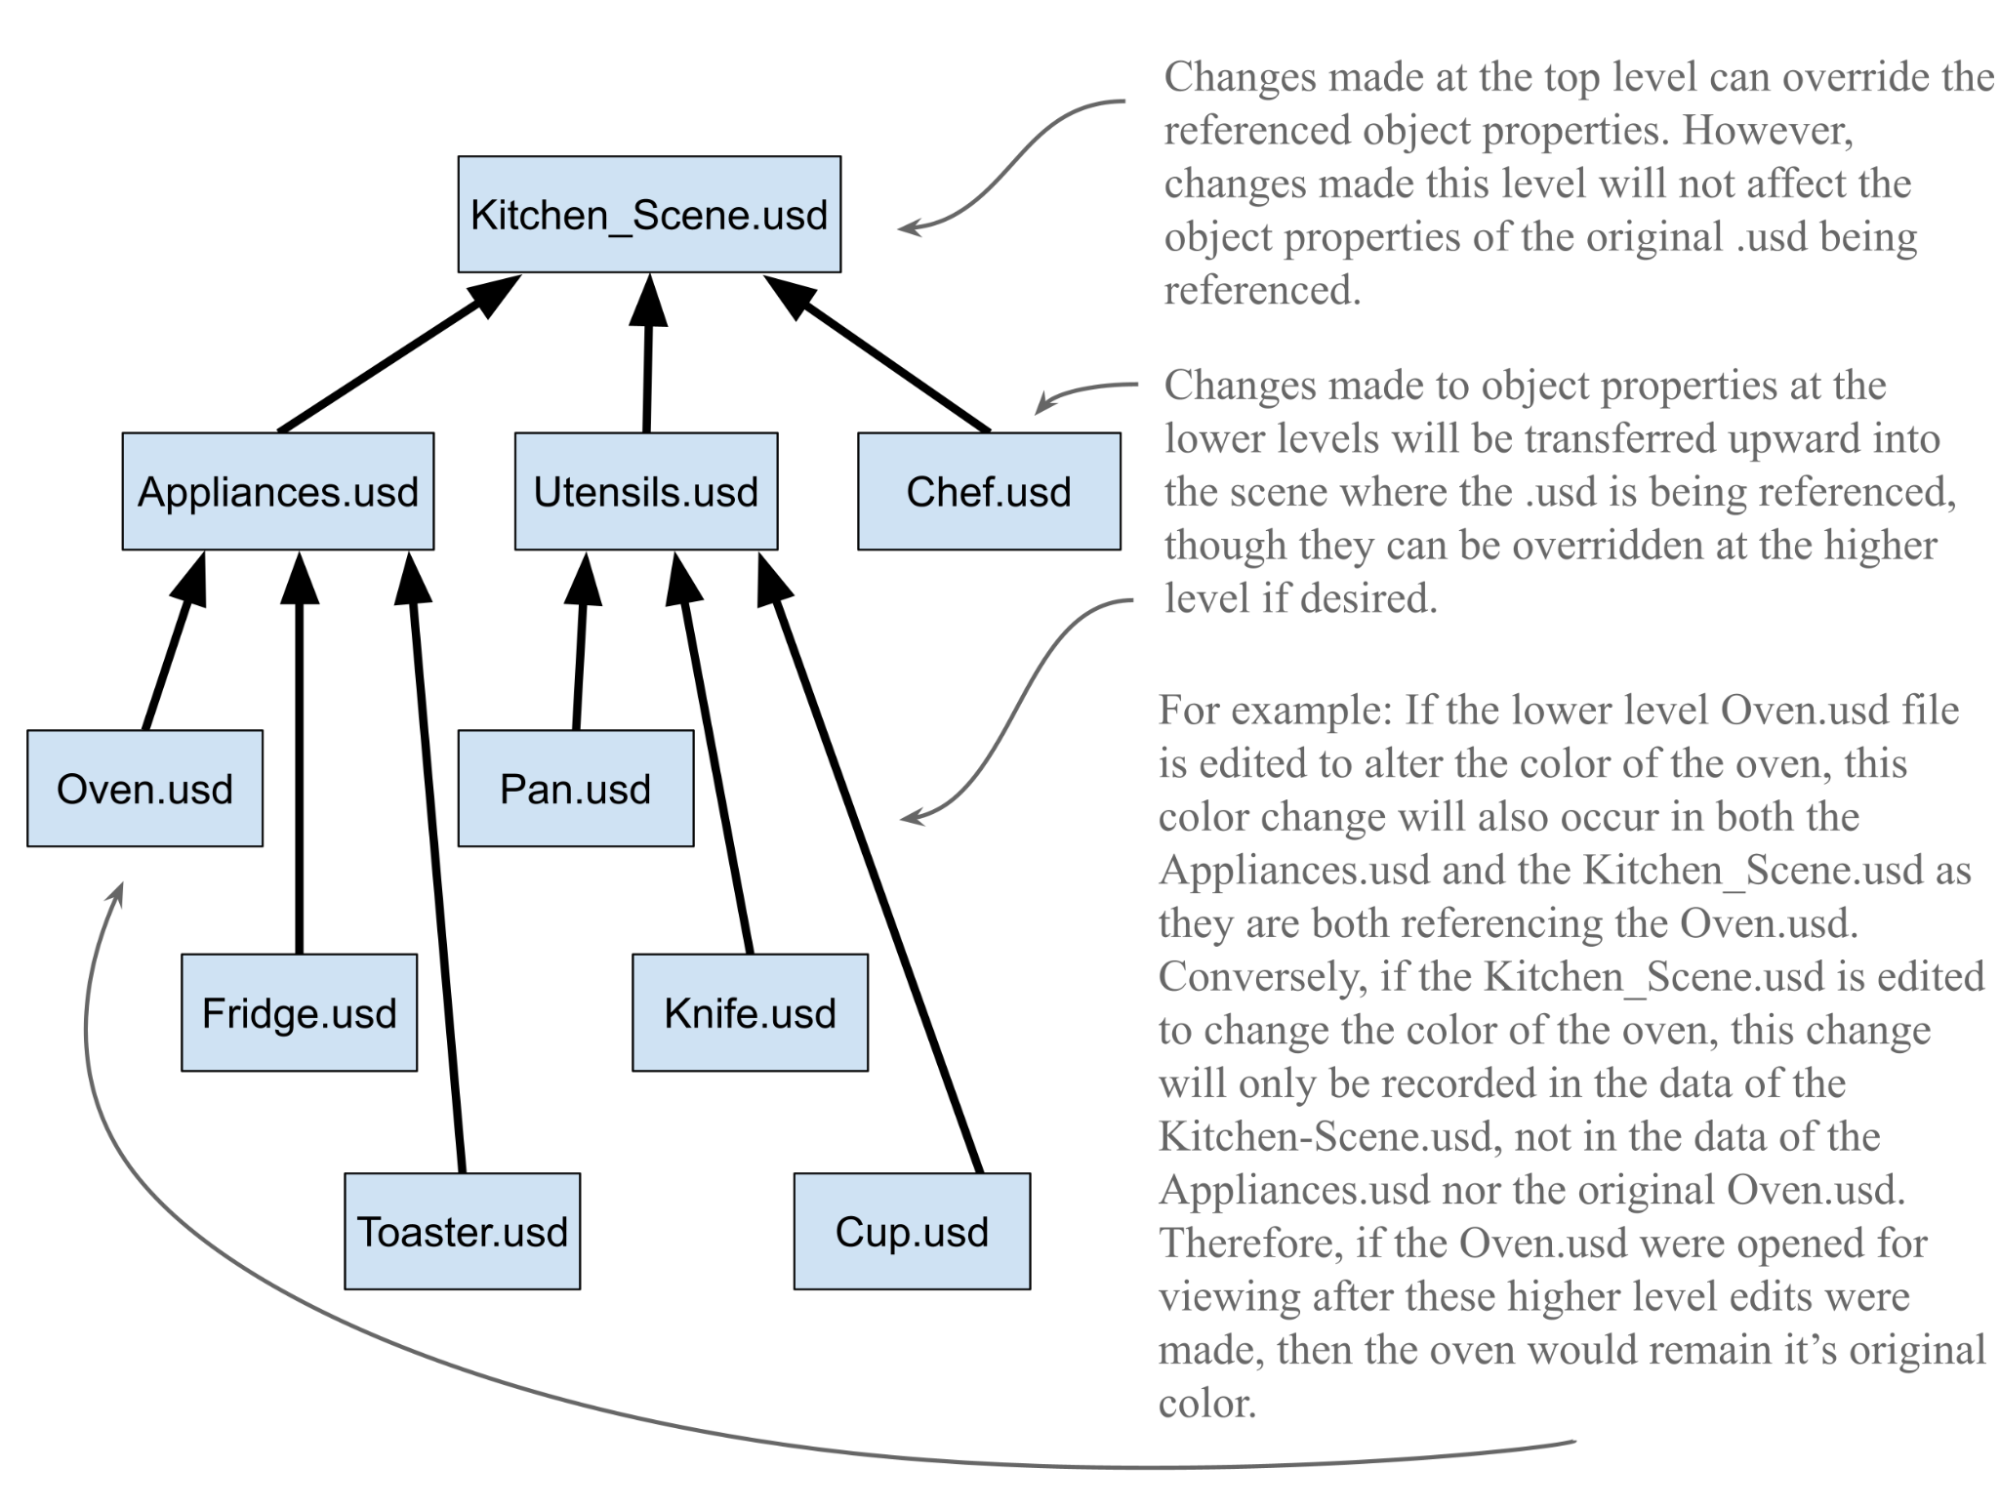
Figure 6:An example of referencing in OpenUSD showing how the data of referenced .usd files is preserved even if it is edited in the stage that is referencing them. The edits made are only stored in the data of the .usd that is doing the referencing. This is one of the ways that non-destructive workflows are achieved by OpenUSD.
Before we begin importing assets, it is worth taking a moment to consider the best location for the files we’re going to be working with.
3.3.2 Considering Directories & File Paths when Referencing
As OpenUSD relies heavily on referencing, it’s important to be mindful of your directory structures when choosing where to save files. Developing a consistent approach for every scene will help avoid issues with locating assets and managing file paths, especially as your scenes become more complex. Moreover, the right directory structure will facilitate portability, allowing you to move files on your disk and share them with others without breaking the references in your scene.
In the next subsection we’re going to reference a .usd file that contains a model of a block with letters on each face. It can be downloaded here: https://
We recommend using the following directory structure for the scene you will create in the next subsection and adopting this approach for any future scenes. Note that the downloaded Ch03 folder already includes an Assets folder with the Block_Blue.usd file inside. Also note that the blocks.usda file is not yet present in the Ch03 folder because that is the file we will create in the next subsection. By creating the new ‘blocks.usda’ in the same directory as the asset folder, you will be able to reference any assets within it using a relative path:
/Ch03
├── Assets
│   ├── Block_Blue.usd
└── blocks.usdaOnce we create and import assets to the new blocks.usda file in the next subsection, Colab users wishing to view the .usd file will need to download the Ch03 folder from their GDrive to their machine, or have their GDrive desktop client synced. As we have set the directory correctly, the reference contained in the .usd file will be preserved.
3.3.3 Using References
A reference targets a prim and loads it onto the stage, along with any descendants (children) it may have. References may be internal, targeting a prim that is already present on the stage, or external, targeting a prim that is not currently on the stage. Any internal reference should target an Sdf.Path of a prim within the stage, whereas any external reference should use a file path string to target an asset file.
When you reference an external stage (e.g., through a file path) without specifying a specific prim path, the defaultPrim is automatically used as the target of the reference. The defaultPrim is a special prim in a USD stage that serves as the entry point for the stage. It is typically defined at the root level of the stage hierarchy and points to a primary object or model in the scene. This allows the referencing stage to import the default object or model from the external asset without needing to explicitly define which prim to target. The defaultPrim is especially useful in cases where there is a main model or scene graph structure that is intended to be the central object of a stage.
Let’s start using references by first defining some custom functions that load the AddInternalReference() and AddReference() methods into the interpreter’s active memory so that we can call them later.
The following code will define two custom functions that will later be called to reference either external or internal prims. Conventionally, in the internal_reference function, the ref_target_path parameter is used to specify the path to the target prim within the same USD stage, while in the external_reference function, the ref_asset_path parameter is used to provide the path to an external asset file, such as another .usd file:
After importing the necessary modules:
from pxr import Usd, SdfWe can define:
def internal_reference(prim: Usd.Prim, ref_target_path: Sdf.Path):
    references: Usd.References = prim.GetReferences()
    references.AddInternalReference(
        primPath=ref_target_path
     )
Program 1:Add internal reference
And
def external_reference(prim: Usd.Prim, ref_asset_path: str):
    references: Usd.References = prim.GetReferences()
    references.AddReference(
        assetPath=ref_asset_path
        )
Program 2:Add external reference
Having established an external reference function above, with the following code we’re going to create a new stage named blocks.usda, which contains an external reference to the example Block_Blue.usd file that we have provided. It will do so by calling the external_reference function we created earlier:
from pxr import Usd, UsdGeom, Sdf

stage = Usd.Stage.CreateNew("blocks.usda")
block1 = UsdGeom.Xform.Define(stage, "/World/Block1")

# Calls the custom function 'external_reference'
external_reference(
    block1.GetPrim(),  # Use GetPrim() method to get the prim
    "<your file path to Block_Blue.usd ex:'./Assets/Block_Blue.usd'>"
    )
stage.Save()
Users of USD Composer and locally running Command Terminals will now be able to view the blocks.usda with the Block_Blue.usd showing on the stage by opening the blocks.usda in a viewer.
3.3.4 Using Payloads
Payloads in OpenUSD provide a flexible way to manage resource-intensive scene elements by allowing selective loading. Unlike references, payloads can remain unloaded until needed, optimizing performance for tasks requiring only specific components. This deferred loading is especially useful for detailed models or complex scenes, enabling efficient navigation of the full stage hierarchy while conserving computational resources. When first loaded, a payload creates a placeholder in the stage hierarchy. Unloading the payload removes its data but retains the placeholder, preserving the hierarchy.
Another key difference between references and payloads is that references update automatically when the source file changes, but modifying a payload’s source file requires manual reloading to update the data in the current stage.
Let’s try introducing a payload to a stage by first defining a function named add_payload, then creating a new stage and importing one of the block.usd files by calling the function. Here we will repeat steps we have learned earlier, namely, defining a custom function; creating a new stage in the current working directory; defining an Xform; and using a relative path to reference an asset:
from pxr import Usd, Sdf, UsdGeom

def add_payload(prim: Usd.Prim, payload_asset_path: str):
    payloads: Usd.Payloads = prim.GetPayloads()
    payloads.AddPayload(
        assetPath=payload_asset_path
    )
Program 3:Add Payload
Then,
stage = Usd.Stage.CreateNew("blocks_payload.usd")
block1 = UsdGeom.Xform.Define(stage, '/World/Block1')
add_payload(
    block1.GetPrim(),
    "<your file path to Block_Blue.usd ex: './Assets/Block_Blue.usd'>"
    )

stage.Save()
It is also possible to remove payloads from the stage, if they are no longer required. For example, you’re working on a complex scene such as a busy city street and want to keep processing performance at its best. You’ve already loaded the models of the highrise buildings as payloads whilst you were editing their appearance and location, however, now you need to move on and start editing the models of cars in the street. This would be a good time to unload the payloads of the buildings, as that data is not required for your new task and will only be using processing power that would be better used on rendering the subjects you are currently editing in the viewport, the car models.
When unloaded, a payload remains as a placeholder in the stage hierarchy, and its data is external until actively resolved by loading it back into memory. This is a runtime operation, meaning it only affects the memory (by unloading the data), not the file or the stage hierarchy itself.
If you decide you don’t want a payload on the stage (temporarily), you can unload the payload using the GetPrim().Unload() method. The following snippet shows how it would be applied to the block1 prim:
# Unloads the payload associated with the prim at '/World/Block1'
block1.GetPrim().Unload()
Unloading a payload does not delete the prim or its reference to the payload. It simply removes the data associated with that payload from memory. Depending on your viewer, you may still be able to see the unloaded payload as a placeholder. This happens because unloading does not remove the prim, only the data it references. To confirm that the data has been unloaded, you can use the IsLoaded() method. If the payload was successfully unloaded, it will return False:
block1.GetPrim().IsLoaded() If you unloaded the payload and now want to reload it back onto the stage, you can use the Load() method. Since the payload is still referenced by the prim (as a placeholder), you can load the data back into memory with the following:
# Loads Block_Blue.usd payload back to the prim associated with '/World/Block1'
block1.GetPrim().Load()
Having looked at referencing objects in a scene, let’s take a look at the fundamental properties of the scene itself, the stage properties. These are very important to consider when setting up a scene as they will have an effect on how your referenced models appear when they are imported.
3.4 Setting Stage Properties
In OpenUSD programming, in many cases, you may need to set some settings of the stage, such as axis direction and unit. This is particularly important when working with 3D models, as the orientation and scale of the model can greatly impact the final output
To achieve this, OpenUSD provides a range of APIs that allow you to configure the stage settings programmatically. For example, you can use the UsdGeom.SetStageUpAxis() function to set the up-axis direction of the stage, which determines the orientation of the model in 3D space.
Set the stage’s up-axis with:
from pxr import UsdGeom
# Sets the y-axis as the up-axis. This can be x or z if required.
UsdGeom.SetStageUpAxis(stage, UsdGeom.Tokens.z) Additionally, you can use the UsdGeom.SetStageUnits() function to set the unit of measurement for the stage, which affects the scale of the model. This is useful when working with models that have been created in different units, such as meters or feet.
Set the unit measurement with:
# This equates to one centimeter per unit.
UsdGeom.SetStageMetersPerUnit(stage, 0.01)
By setting these stage settings correctly, you can ensure that your 3D models are displayed accurately and consistently across different applications and platforms. This is especially important in industries such as film, architecture, and product design, where precision and accuracy are crucial.
It is also essential to set the defaultPrim metadata on a Stage if the Stage’s root layer is intended to be used as a Reference or Payload in another .usd scene. For example, if one stage contains both /World prim and /Environment prim, a reference to it can be confused about which one to refer to. The default prim must be a top-level prim on the Stage.
Setting the default Prim metadata of the Stage’s root layer avoids forcing consumers of your Stage to specify a target prim when creating a Reference or Payload arc. Note that while Usd.Stage.SetDefaultPrim() can accept any type of Usd.Prim, the default prim must be a top-level prim on the Stage, ensuring that the reference or payload is properly anchored.
Set the default prim with:
# Set default prim
stage.SetDefaultPrim(world_prim)

## Get default prim when needed
# default_prim = stage.GetDefaultPrim()

stage.Save()
Some other stage settings that you may need to configure in OpenUSD include the stage’s time code, which determines the timing of animations and simulations, and the stage’s frame rate, which affects the smoothness of animations. We will discuss timeline utilities when we need to use them in Chapter 6, which is all about animation.
Having learned how to create prims and get the stage settings set up, let’s look at the options for saving a stage.
3.5 Saving the Scene
As seen in the previous code, we can simply use the Usd.Stage.Save() method to save a stage. It saves the current state of the stage to its root file (the working directory). By saving your stage regularly, you can track changes, collaborate with others, and ensure that your 3D assets are safely stored and can be easily retrieved for future use.
Throughout the book, remember that you can always view any changes you’ve made to a stage by typing the stage.Save() command, then reloading or refreshing your .usd file in your viewer. For example: you’ve just typed in some code for adding a light to the stage and you want to see what effect the light has. In this case, you would type stage.Save(), then reload the .usd in your viewer, and you will be able to view the new light. This is a good habit to get into so that you can check progress and look for potential issues sooner rather than later, and it is very useful when you wish to iterate changes in a scene, such as adjusting layout, settings, or properties of prims. As noted in 3.1 Building a Debut USD Scene, the process for reloading a freshly saved .usd is different in each of the viewers with USD Composer refreshing the stage automatically, USDView requiring you to click ‘Reload All Layers’, and Blender requiring the .usd to be fully reimported.
To export a stage to a new file, you can apply the Usd.Stage.Export(filename) method, which not only saves the stage but also enables format conversions between USD ASCII (.usda) and USD binary (.usdc) serialization formats, depending on the file extension specified. Table 1 explores the difference between the various types of .usd formats.
Table 1:USD files come in several formats, each serving a specific purpose and offering distinct advantages.
| USD File Format | Key Features |
|---|---|
| .usd | The by-default format of OpenUSD files, can essentially be .usda or .usdc format. |
| .usda | A text-based, human-readable format that stores scene data in a plain text file. It’s ideal for debugging, editing, and reviewing scene data, as well as for collaborating with others. However, due to its text-based nature, .usda files can be large and may not be optimized for performance. |
| .usdc | A binary, compact representation of scene data. It’s optimized for storage and transmission, making it well-suited for production pipelines where file size and load times are critical. |
| .usdz | A ZIP archive that contains a USD scene, along with any external resources, such as textures or shaders. It is a convenient way to package and distribute USD scenes, ensuring that all necessary assets are included and easily accessible. |
In short, the choice of USD file format depends on the specific use case and requirements. .usd and .usda files are suitable for editing and debugging, while .usdc files are optimized for performance and storage. .usdz files provide a convenient way to package and distribute USD scenes.
The human-readable nature of .usda files allows for easy inspection, editing, and debugging. The snippet shown in Program 4 displays a partial extract of the blocks.usda file we just saved, where we can read the scene’s hierarchical structure and object properties explicitly defined in a human-readable format. The actual .usda contains more information which we’ve left out in order to show the most relevant lines.
#usda 1.0
...
	defaultPrim = "World"
	endTimeCode = 100
	metersPerUnit = 0.01
	startTimeCode = 0
	timeCodesPerSecond = 60
	upAxis = "Y"
)

def Xform "World"
{
	def "Block_Blue" (
    	prepend payload = @file:/D:/Blocks/Assets/Block_Blue.usd@
	)
	{
	}
}
Program 4:Partial extract from the .usda file showing stage settings & the imported Block
Next, let’s export our blocks.usda stage to a different format:
stage = Usd.Stage.Open("blocks.usda")
stage.Export("blocks.usdc")
stage.Export("blocks.usd")
The .usdz format is a ZIP archive that consolidates a USD scene and its external resources—textures, shaders, animations—into a single file, making it ideal for sharing and distributing complete scenes. In Python, you can use the UsdUtils.CreateNewUsdzPackage() function from the UsdUtils module to export a .usd file as a .usdz by providing the input .usd file and the desired .usdz file name. This function automatically resolves file references, dependencies, and packages them into a .usdz archive.
from pxr import UsdUtils
UsdUtils.CreateNewUsdzPackage("blocks.usda", "blocks.usdz")
Another way to compress a .usd file into a .usdz format is to use various tools and software. One popular option is usdzip, a command-line tool provided by Pixar that allows you to create and extract .usdz archives. You can also use any of the 3D GUIs that have built-in support for exporting .usd scenes to .usdz format. USDComposer (or other platforms in the Omniverse suite) allows you to compress into .usdz format. By using these tools, you can easily package and compress your .usd scenes into a single, portable file that can be easily shared and deployed.
Now that we’ve learned how to create, populate and save a scene, in the next chapter we can progress to moving objects around the scene, examining their meshes, and enhancing them with materials.
Summary
- To create a new USD scene using Python script, you can use the
Usdmodule from thepxrlibrary. To define basic geometries, you need to use theUsdGeommodule. - The stage represents a complete scene graph, a hierarchical tree-like structure that contains all the data for a 3D scene. The layer is a container for a set of prims and their associated data. The prim is a basic building block of the scene graph, representing a single object or piece of data in the scene.
Primscan be parents and/or children in the hierarchy and the strings that describe these relationships will define their paths.Referencesallow users to aggregate layers or assets onto a Stage, aligning and managing various elements within a project.Payloadsoffer a strategic approach to managing resource-heavy elements within a scene, providing users with greater control over the loading process.- Different USD file formats serve specific purposes and offer distinct advantages (e.g.,
.usdafor inspection and debugging,.usdcfor performance,.usdzfor packaging and distribution)